FOX IN A BOX DESIGN GUIDE
To help you to design your perfect zip-line, and then order the right Fox in a Box we have prepared this in depth design guide.
There is a bit here so we have split it into 3 parts.
PART 1: THE ESSENTIALS
How do you envision your zip line working?
In this section we will get some clarity on some important points.
- Anatomy of a Zip Line
- Gradient and Sag
- The Three Types. What Type Do You Want To Build?.
- Seat or Handlebars
THE ESSENTIALS - Anatomy of a zip line.
So that we are all talking the same language;
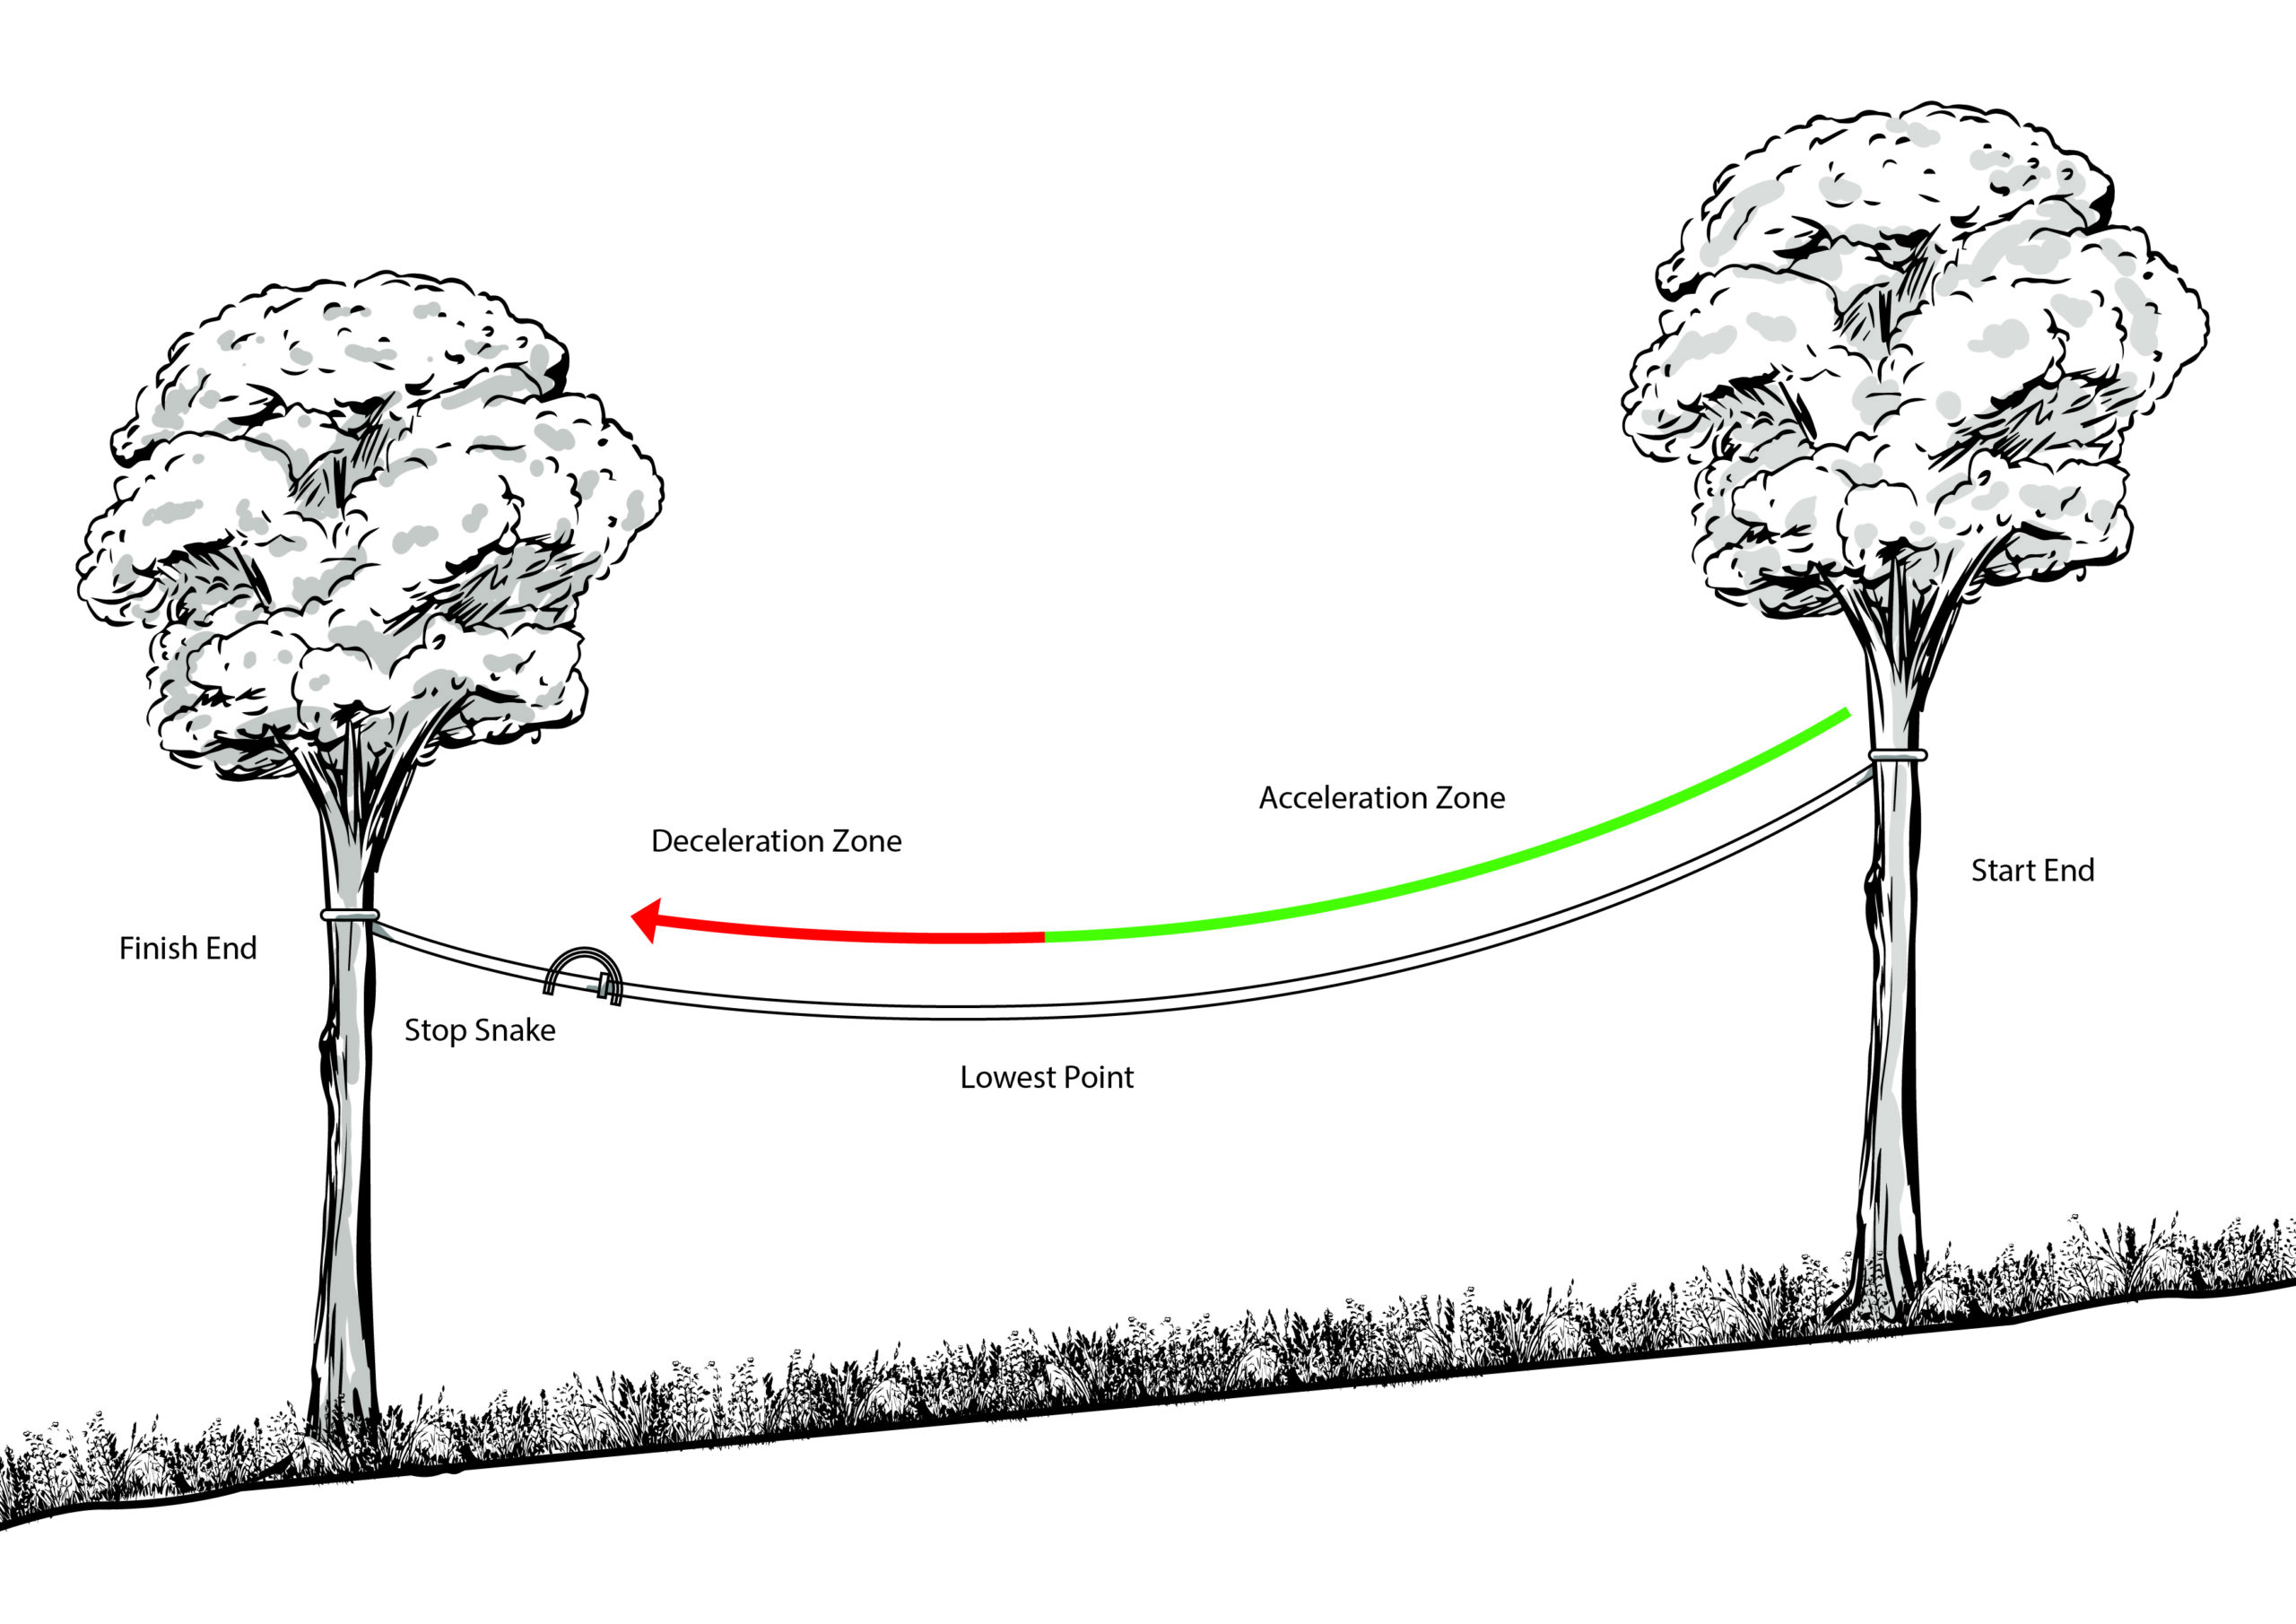
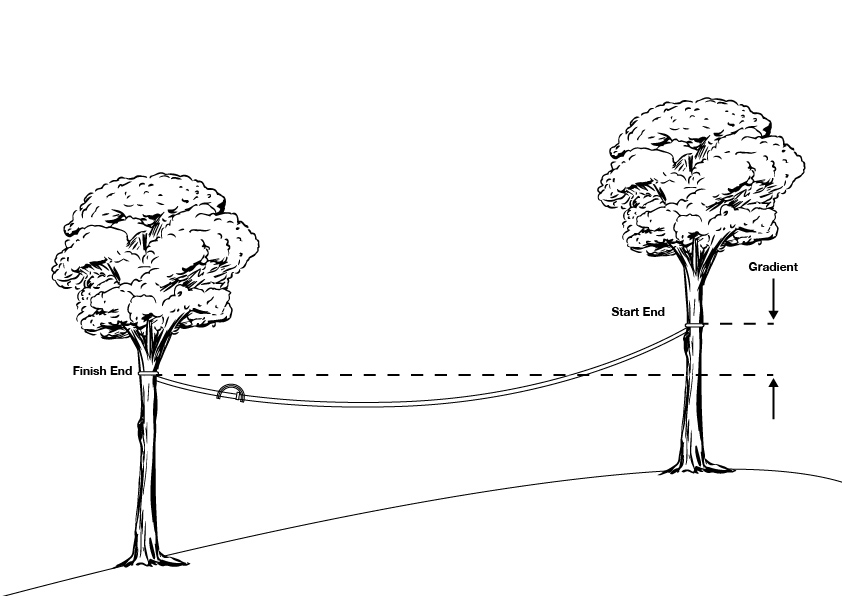
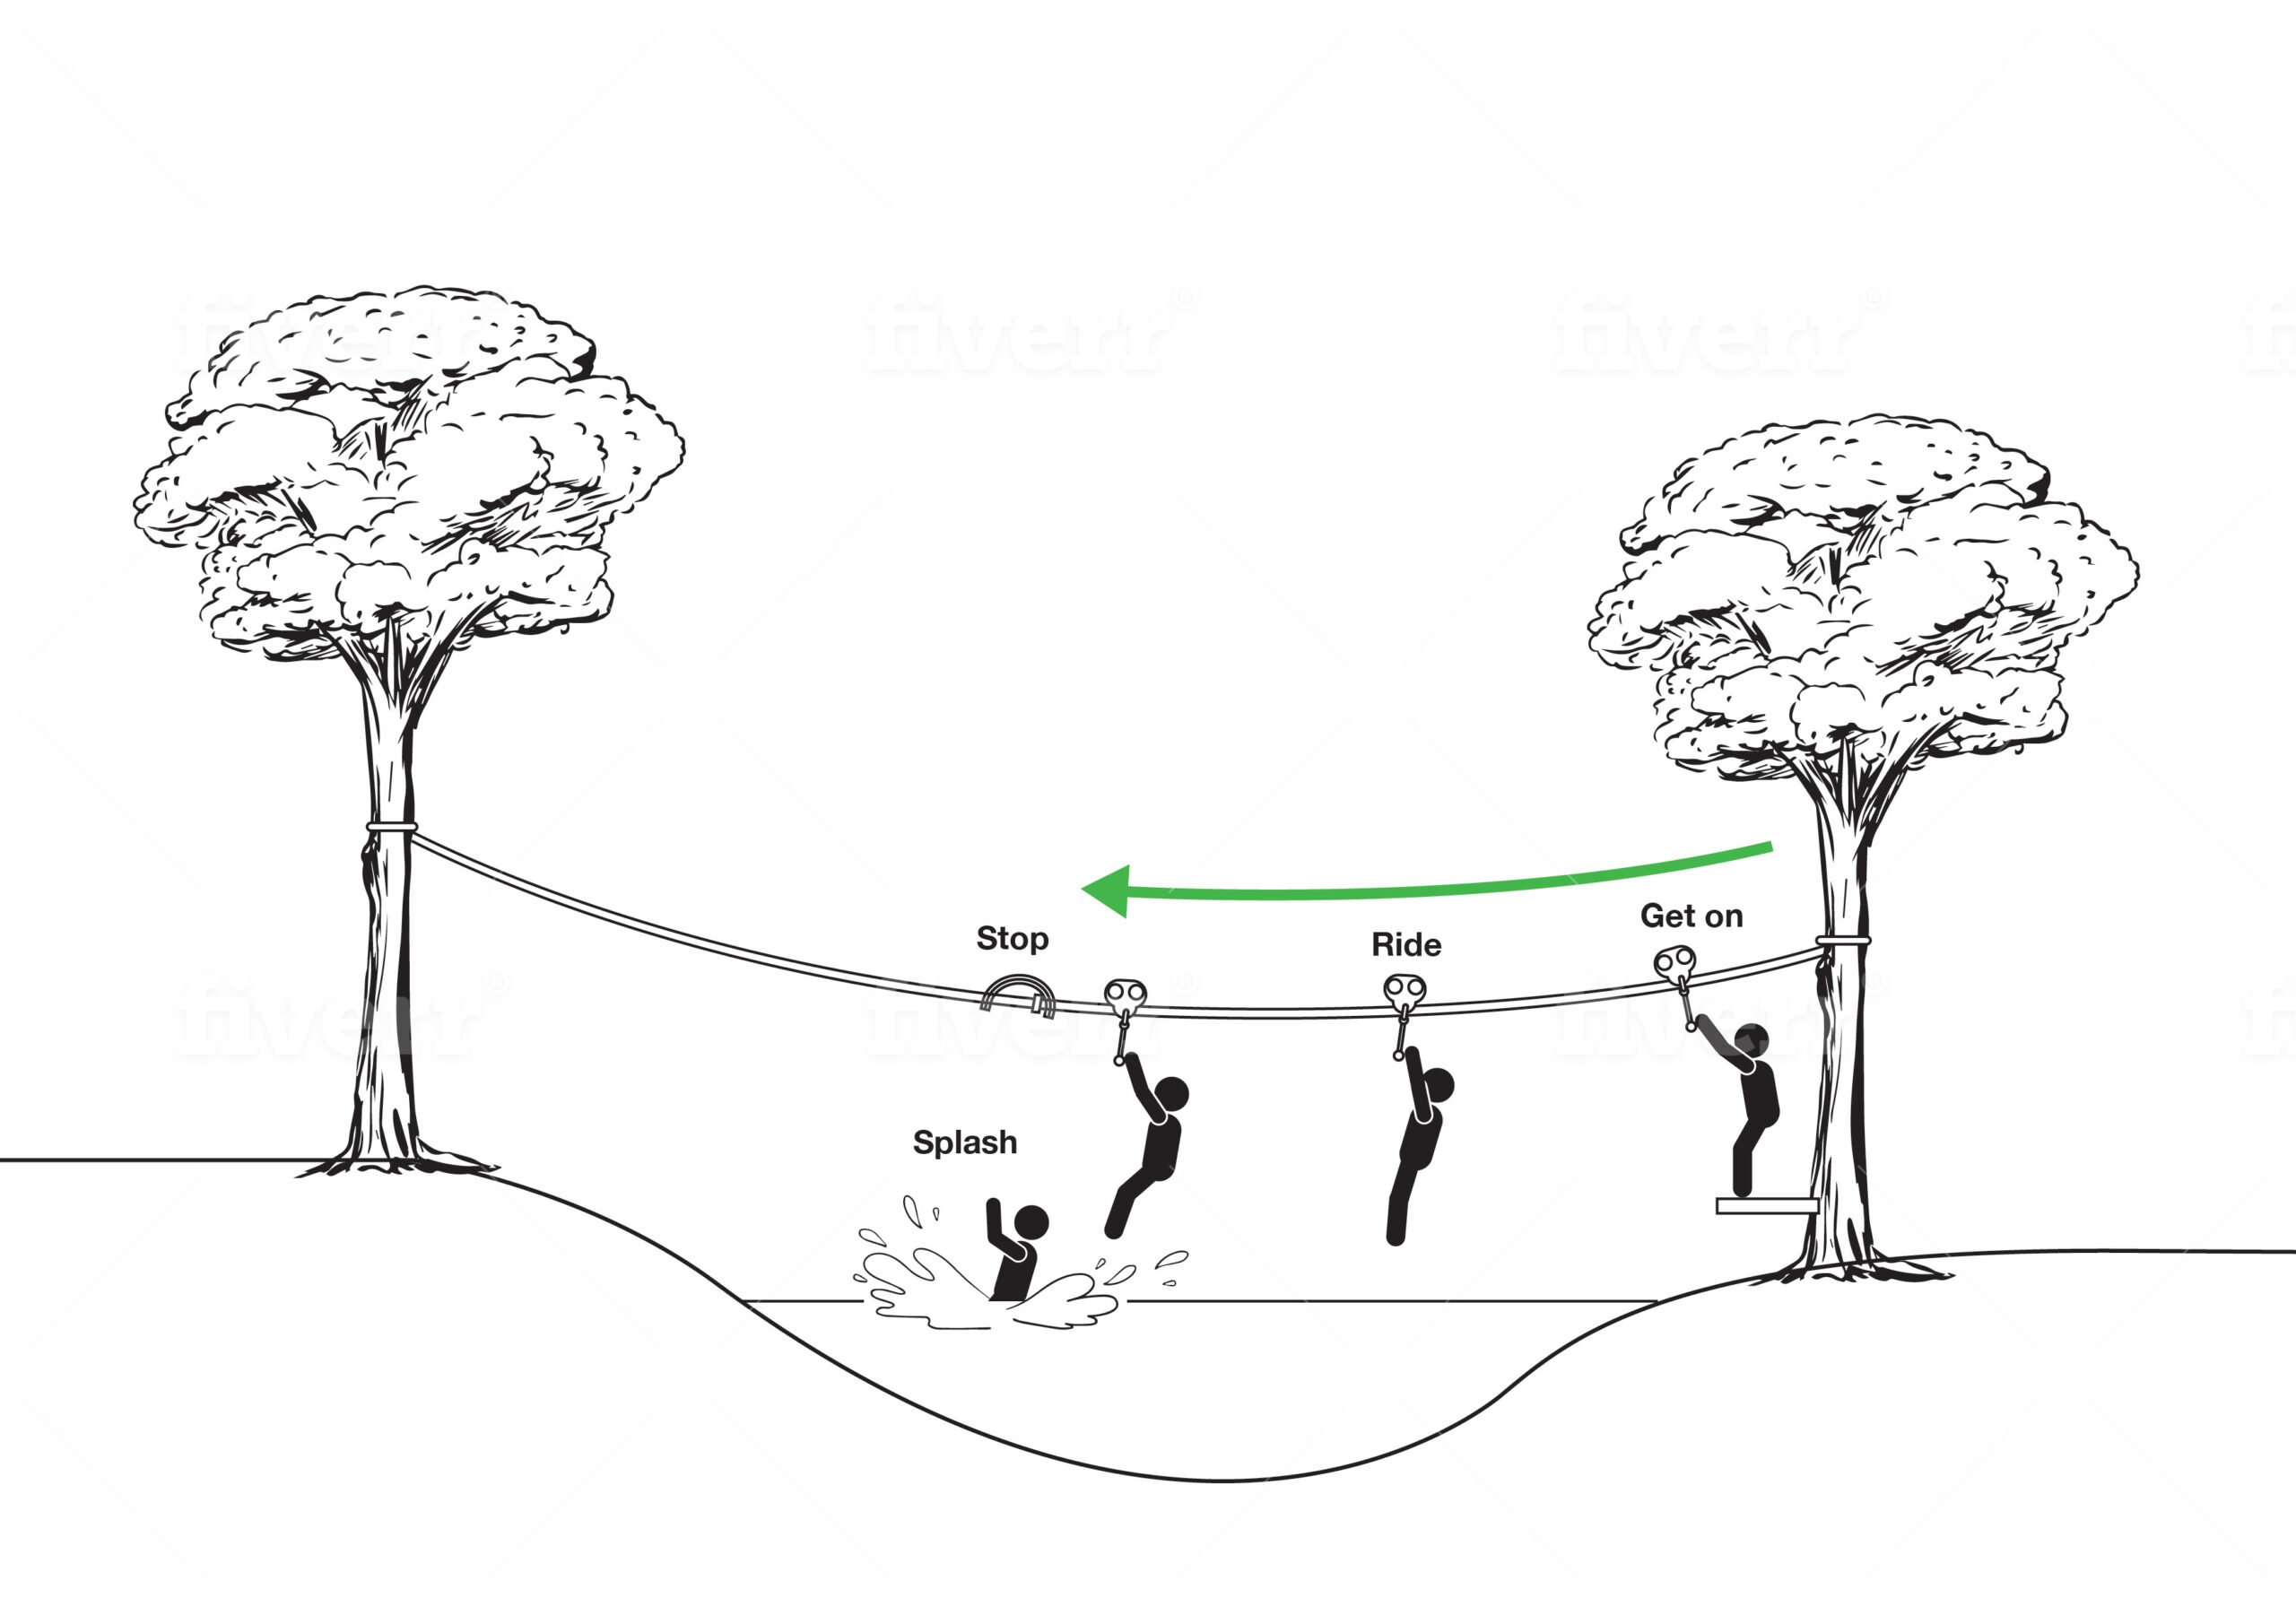
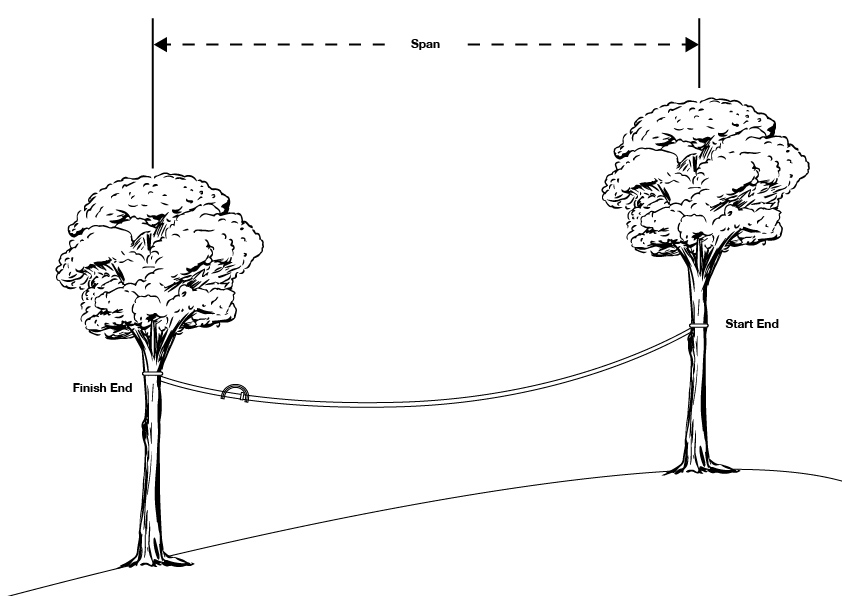
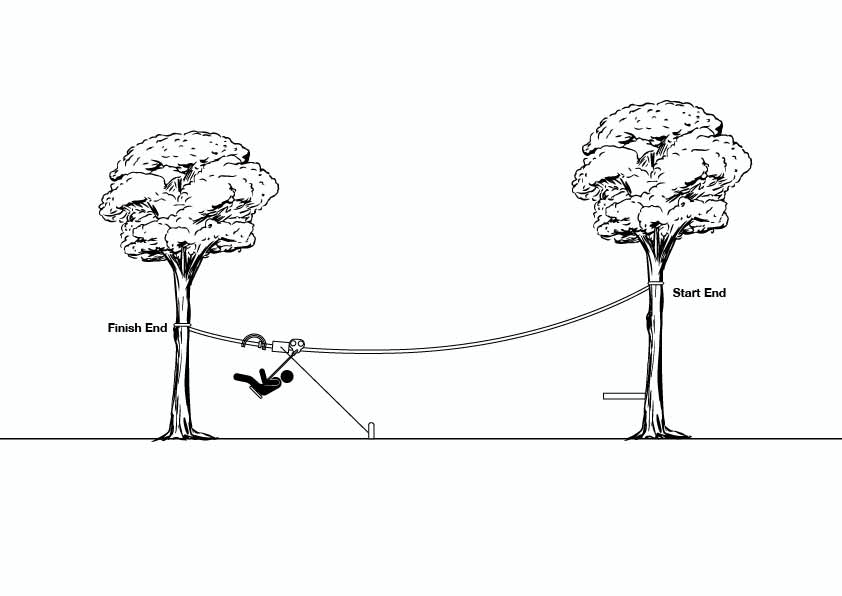
In its most simple form, a zip line is a wire securely attached at a start end and at a finish end. The start end is higher than the finish end. We always leave some sag in the wire, this creates a curve, and a lowest point.
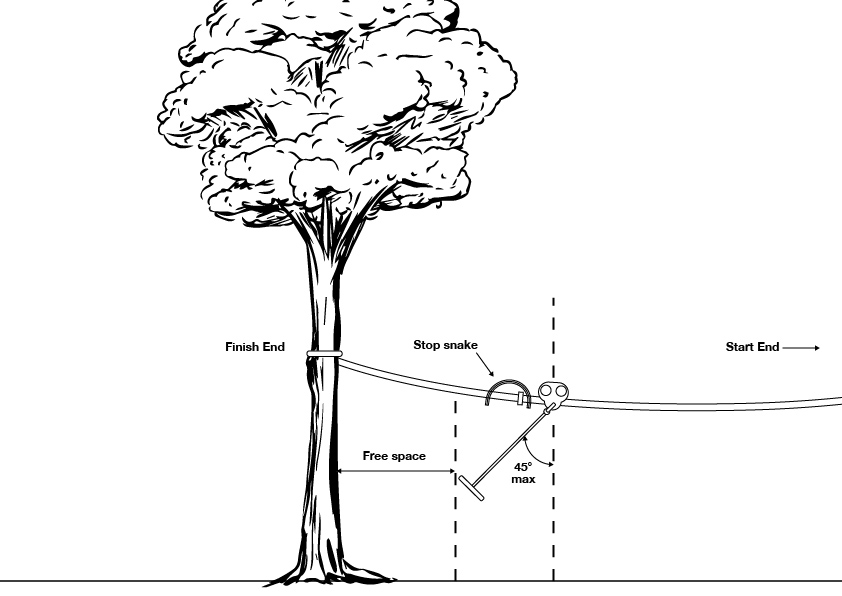
A rider will typically accelerate to the lowest point, then begin to slow down and just reach the “Stop Snake”. This is a governor – or emergency stop – it is a failsafe against hitting the finish end.
Often the zip line will be furnished with some sort of platform at the start end so riders can get on.
THE ESSENTIALS - Gradient and Sag
This “Start is higher than the finish” we call this the gradient.
Gradient is what makes Zip-Lines “Go”.
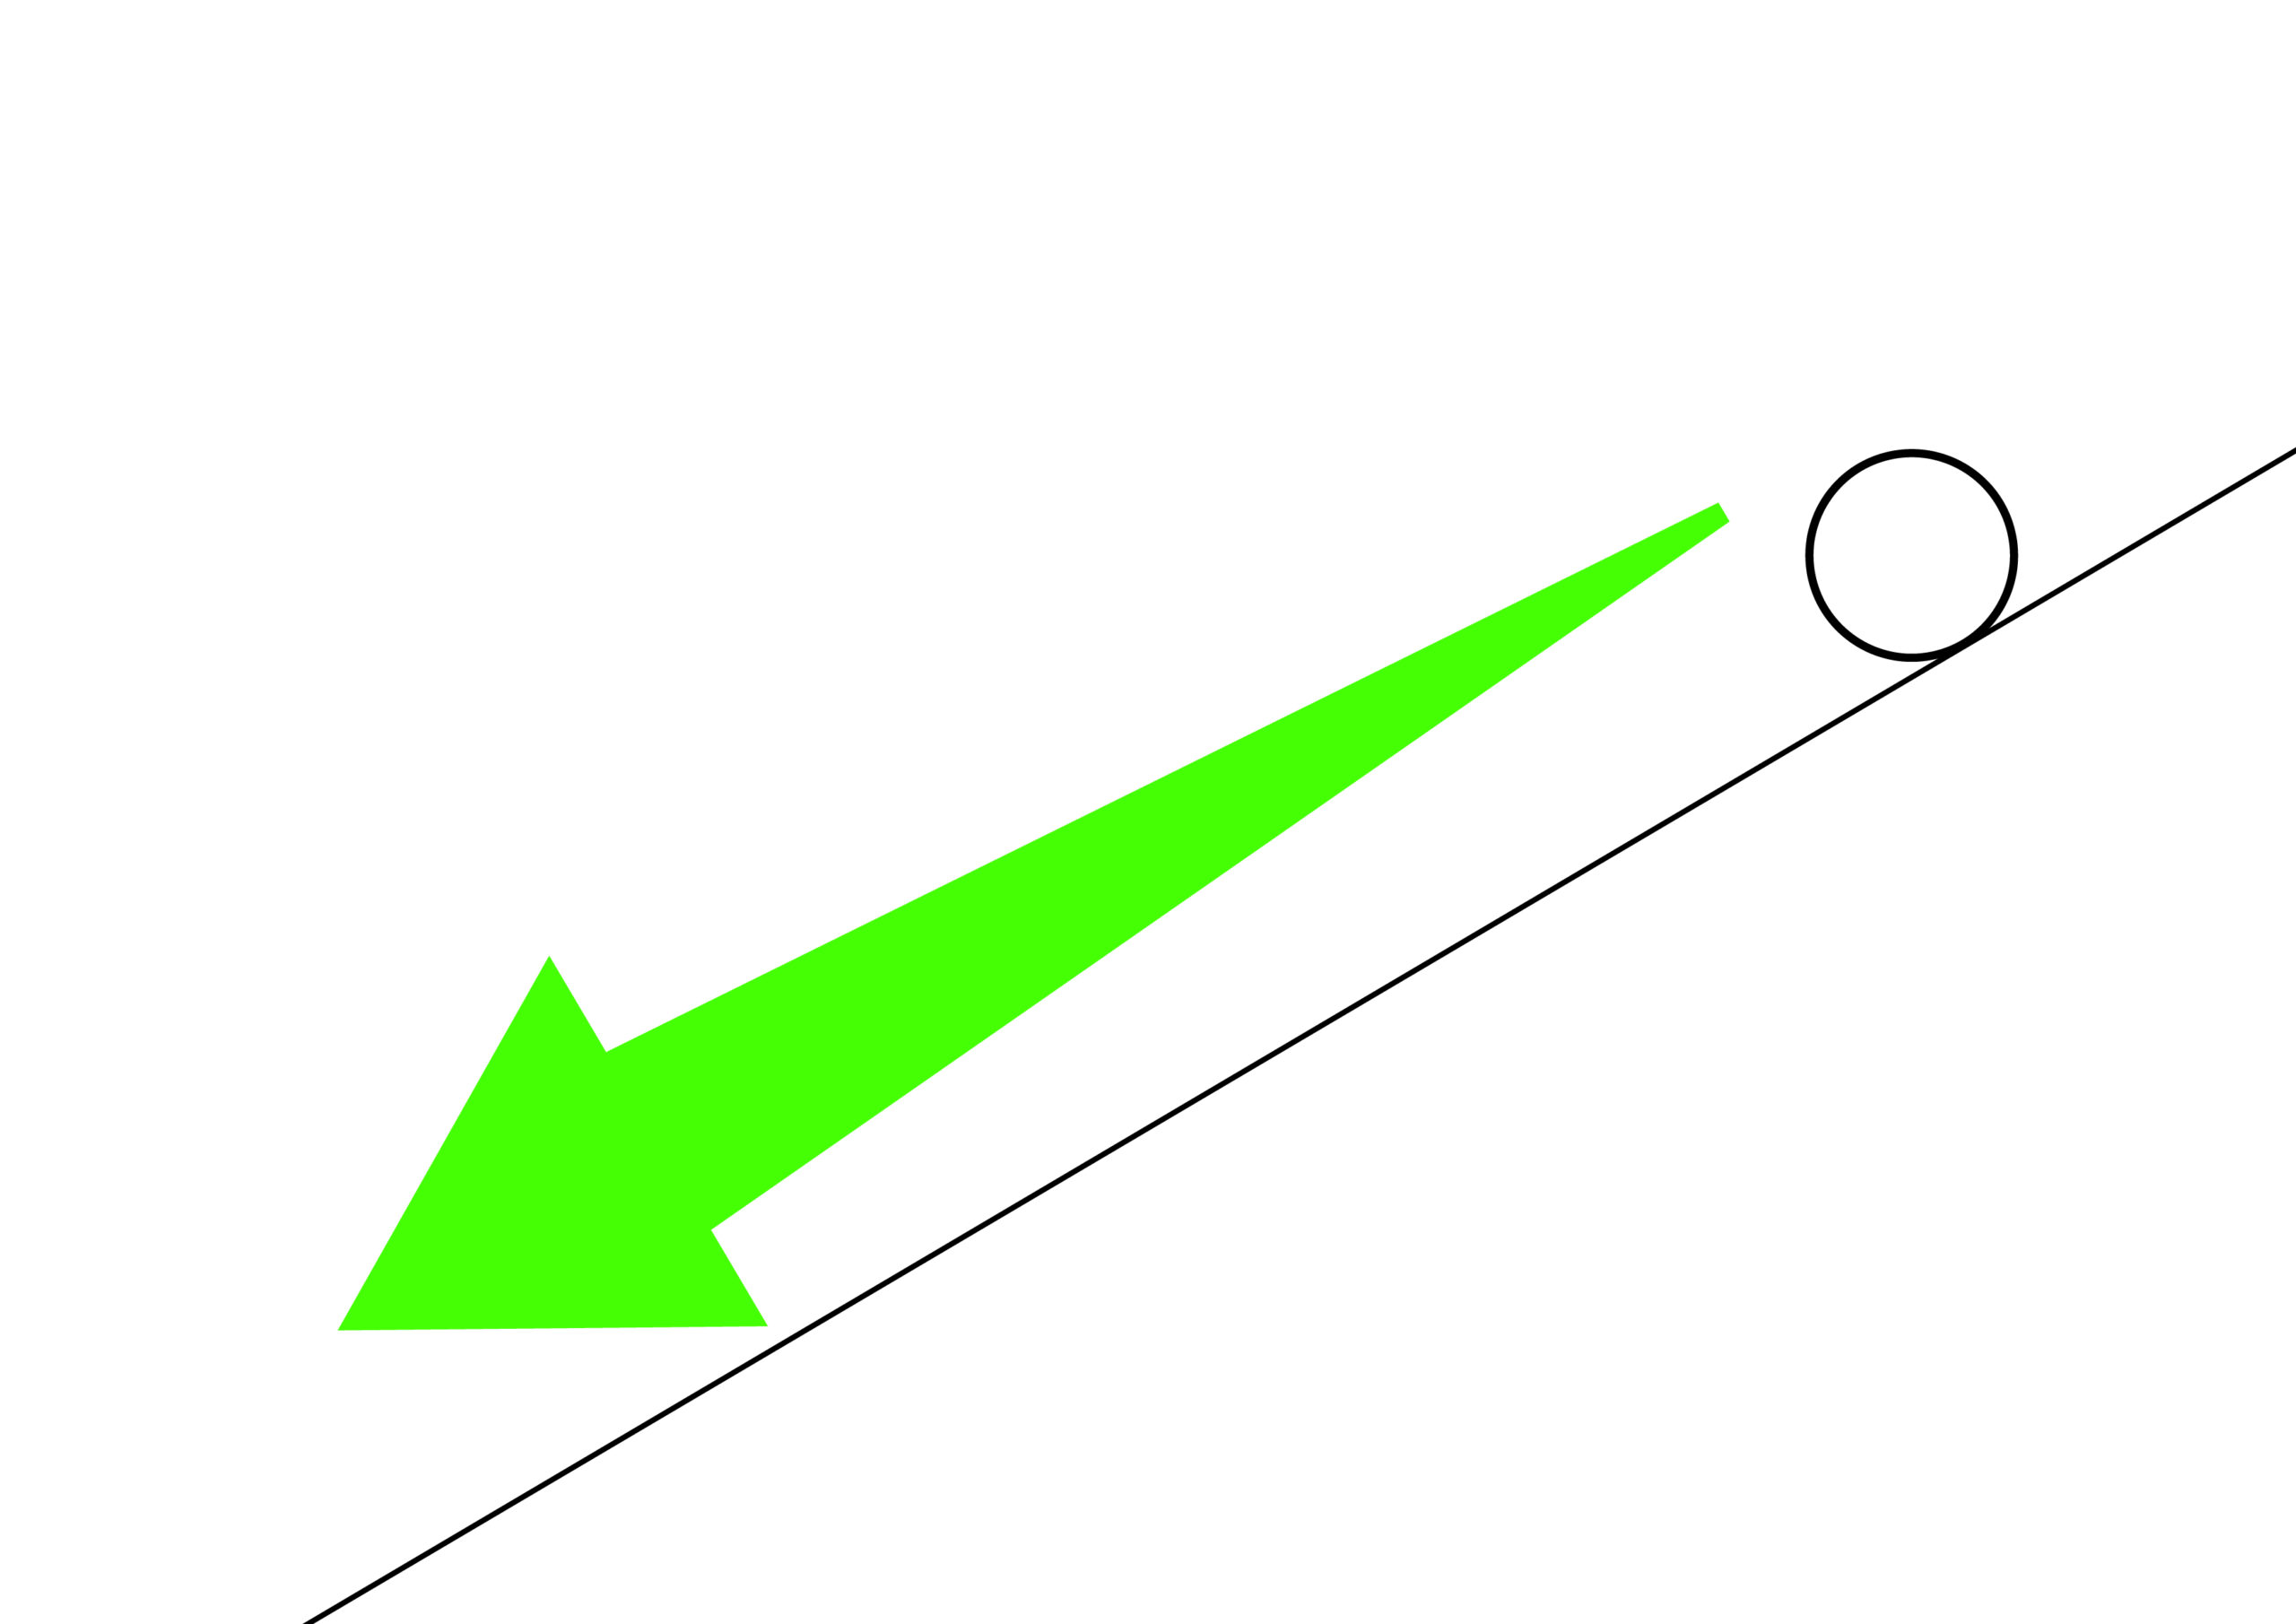
Zip lines work because the pulley rolls down the wire, the steeper the wire, the faster the pulley goes.
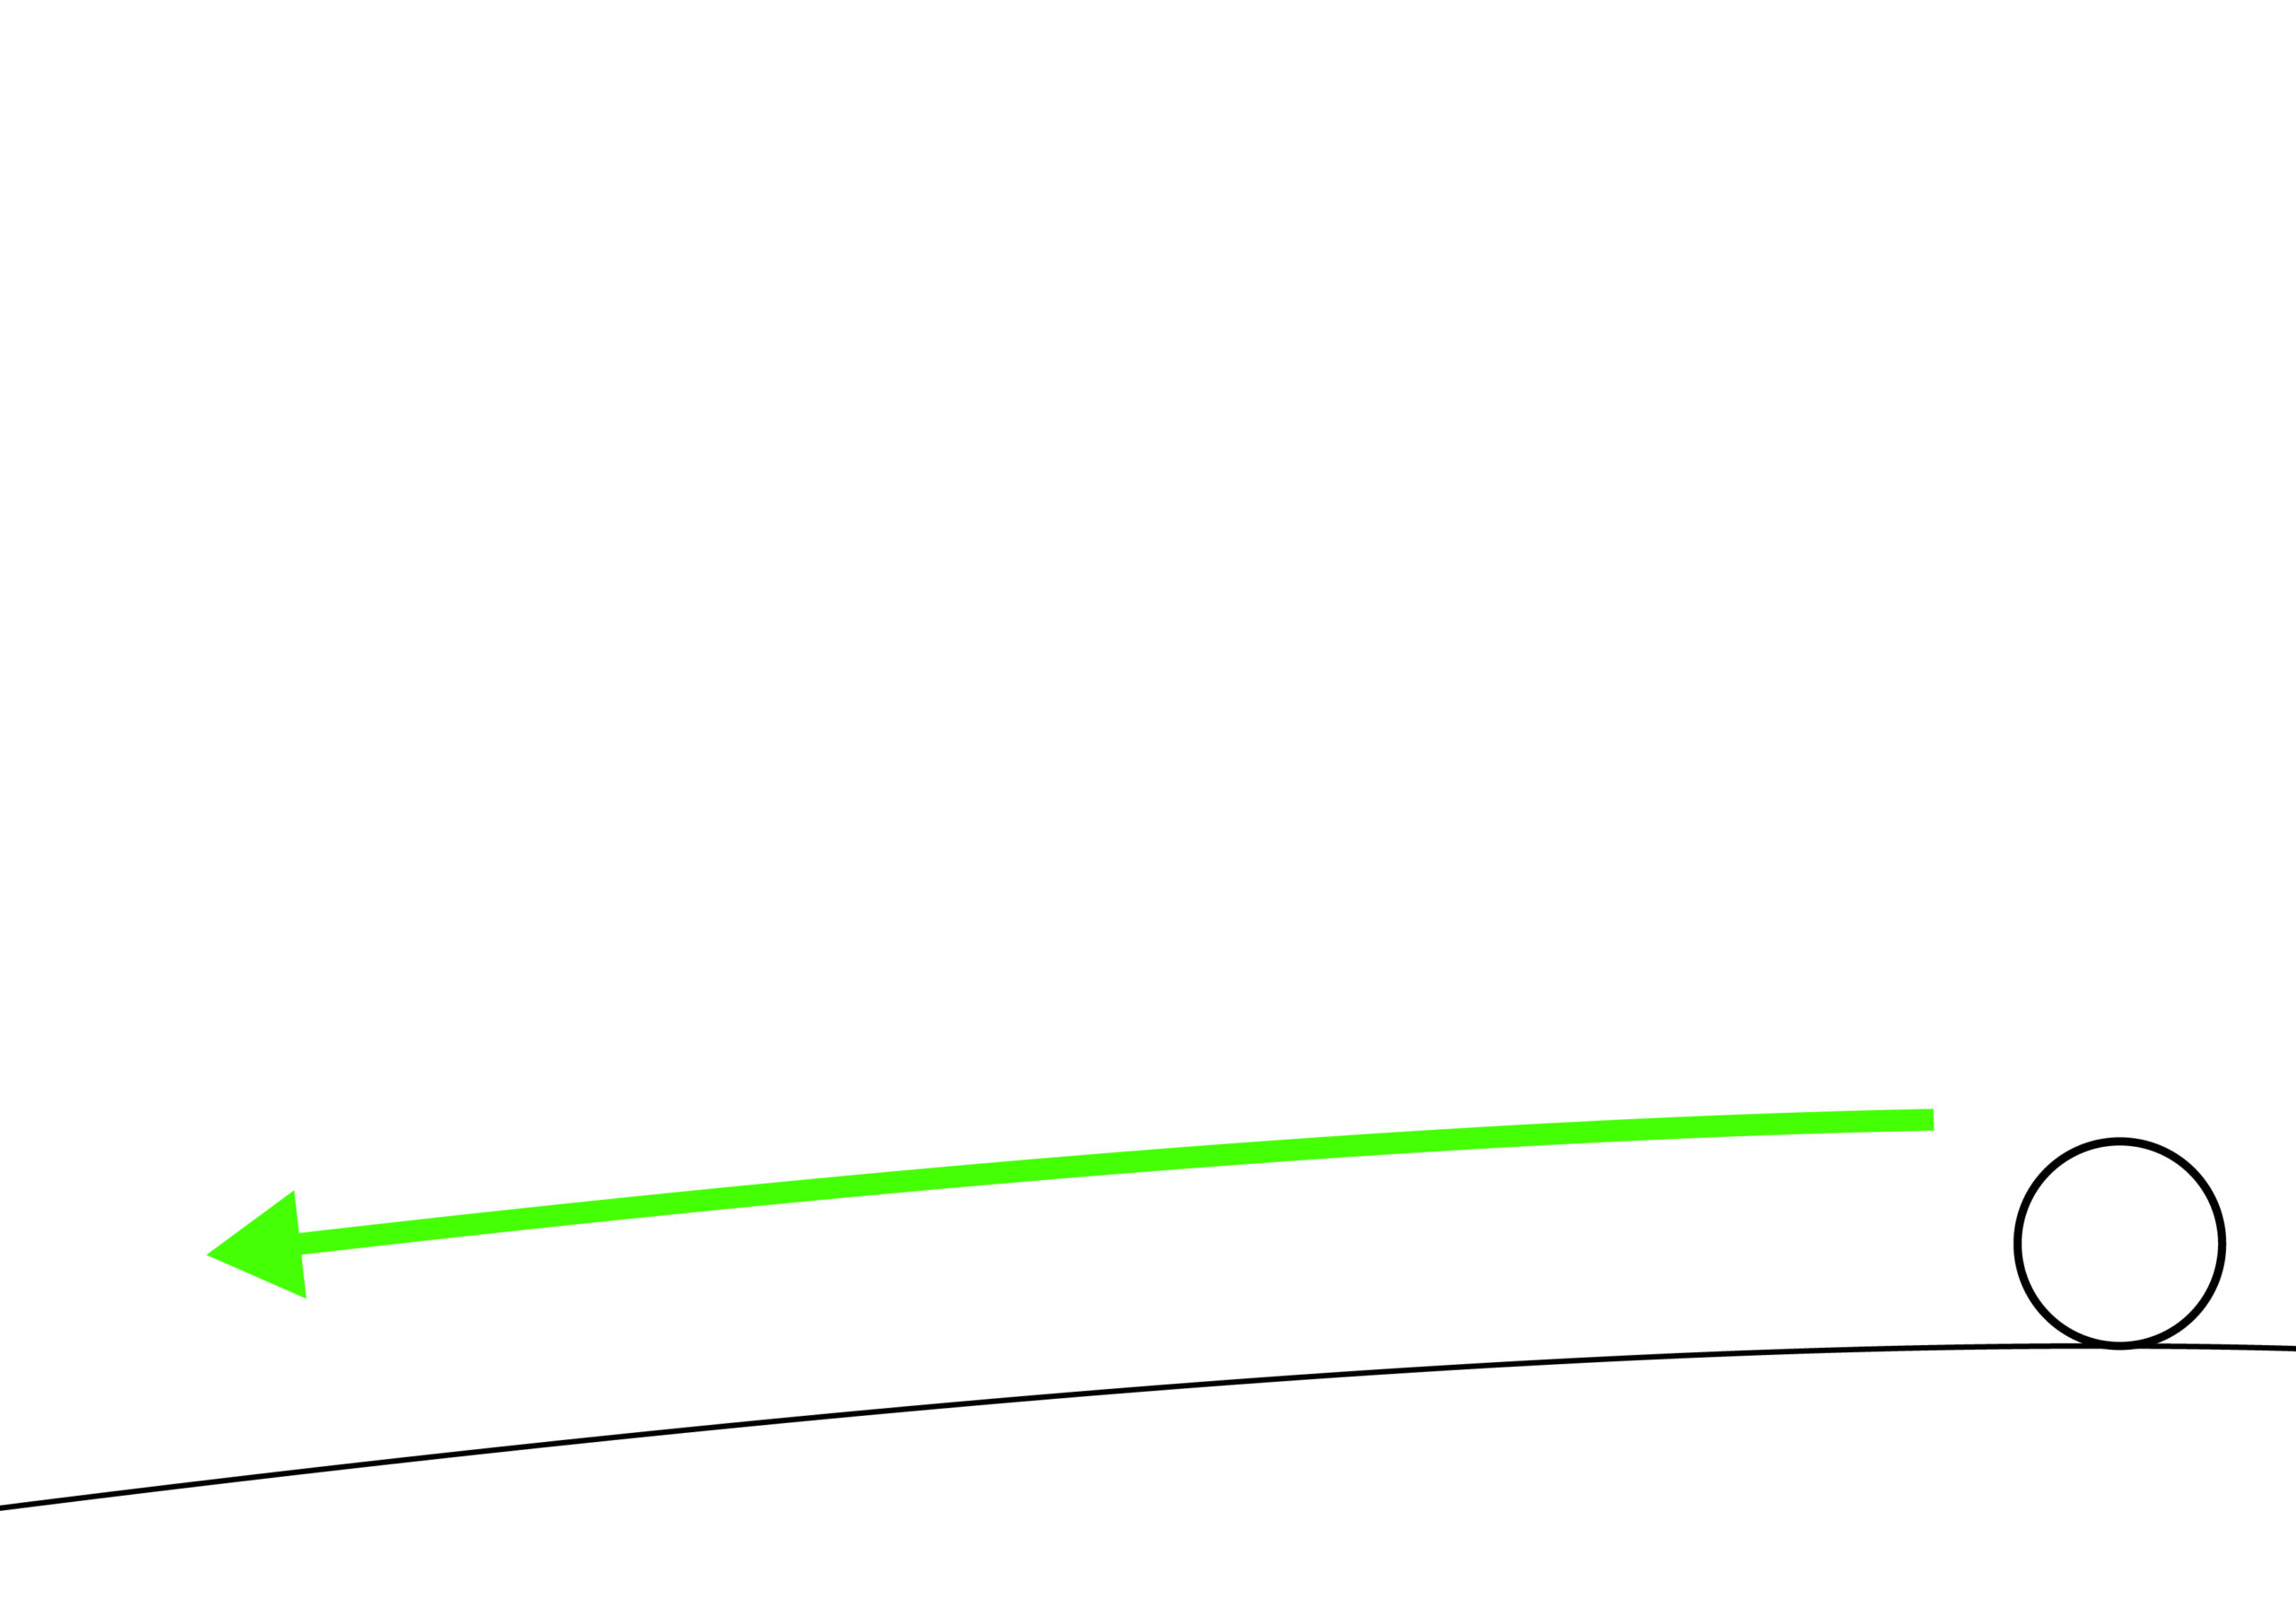
Imagine a marble on a flat surface. The green swoosh is showing the speed of the marble.
GRADIENT = Change in elevation from the start end to the finish end.
We will think of gradient on a zipline as a percentage of Span
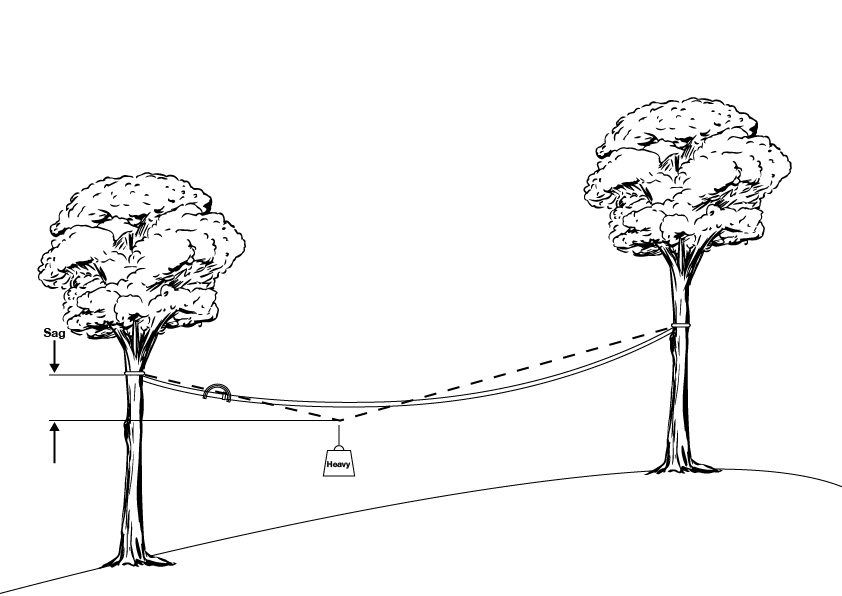
Sag is also crucial in Zip-Lines.
Without sag the rider would constantly accelerate, like the marble above.
And without sag we would put too much strain on our trees.
SAG = Distance below finish end. Measured when loaded with a rider. Aways 2% minimum.
The more sag we allow the less stain on the anchors. (The zip line will apply about 5-8 times the users weight to the anchors, and this would be many times more if there is no sag)
Always allow a minimum 2% Sag (2m per 100m of zip line).
THE ESSENTIALS - 3 Types. What Type Do You Want To Build?.
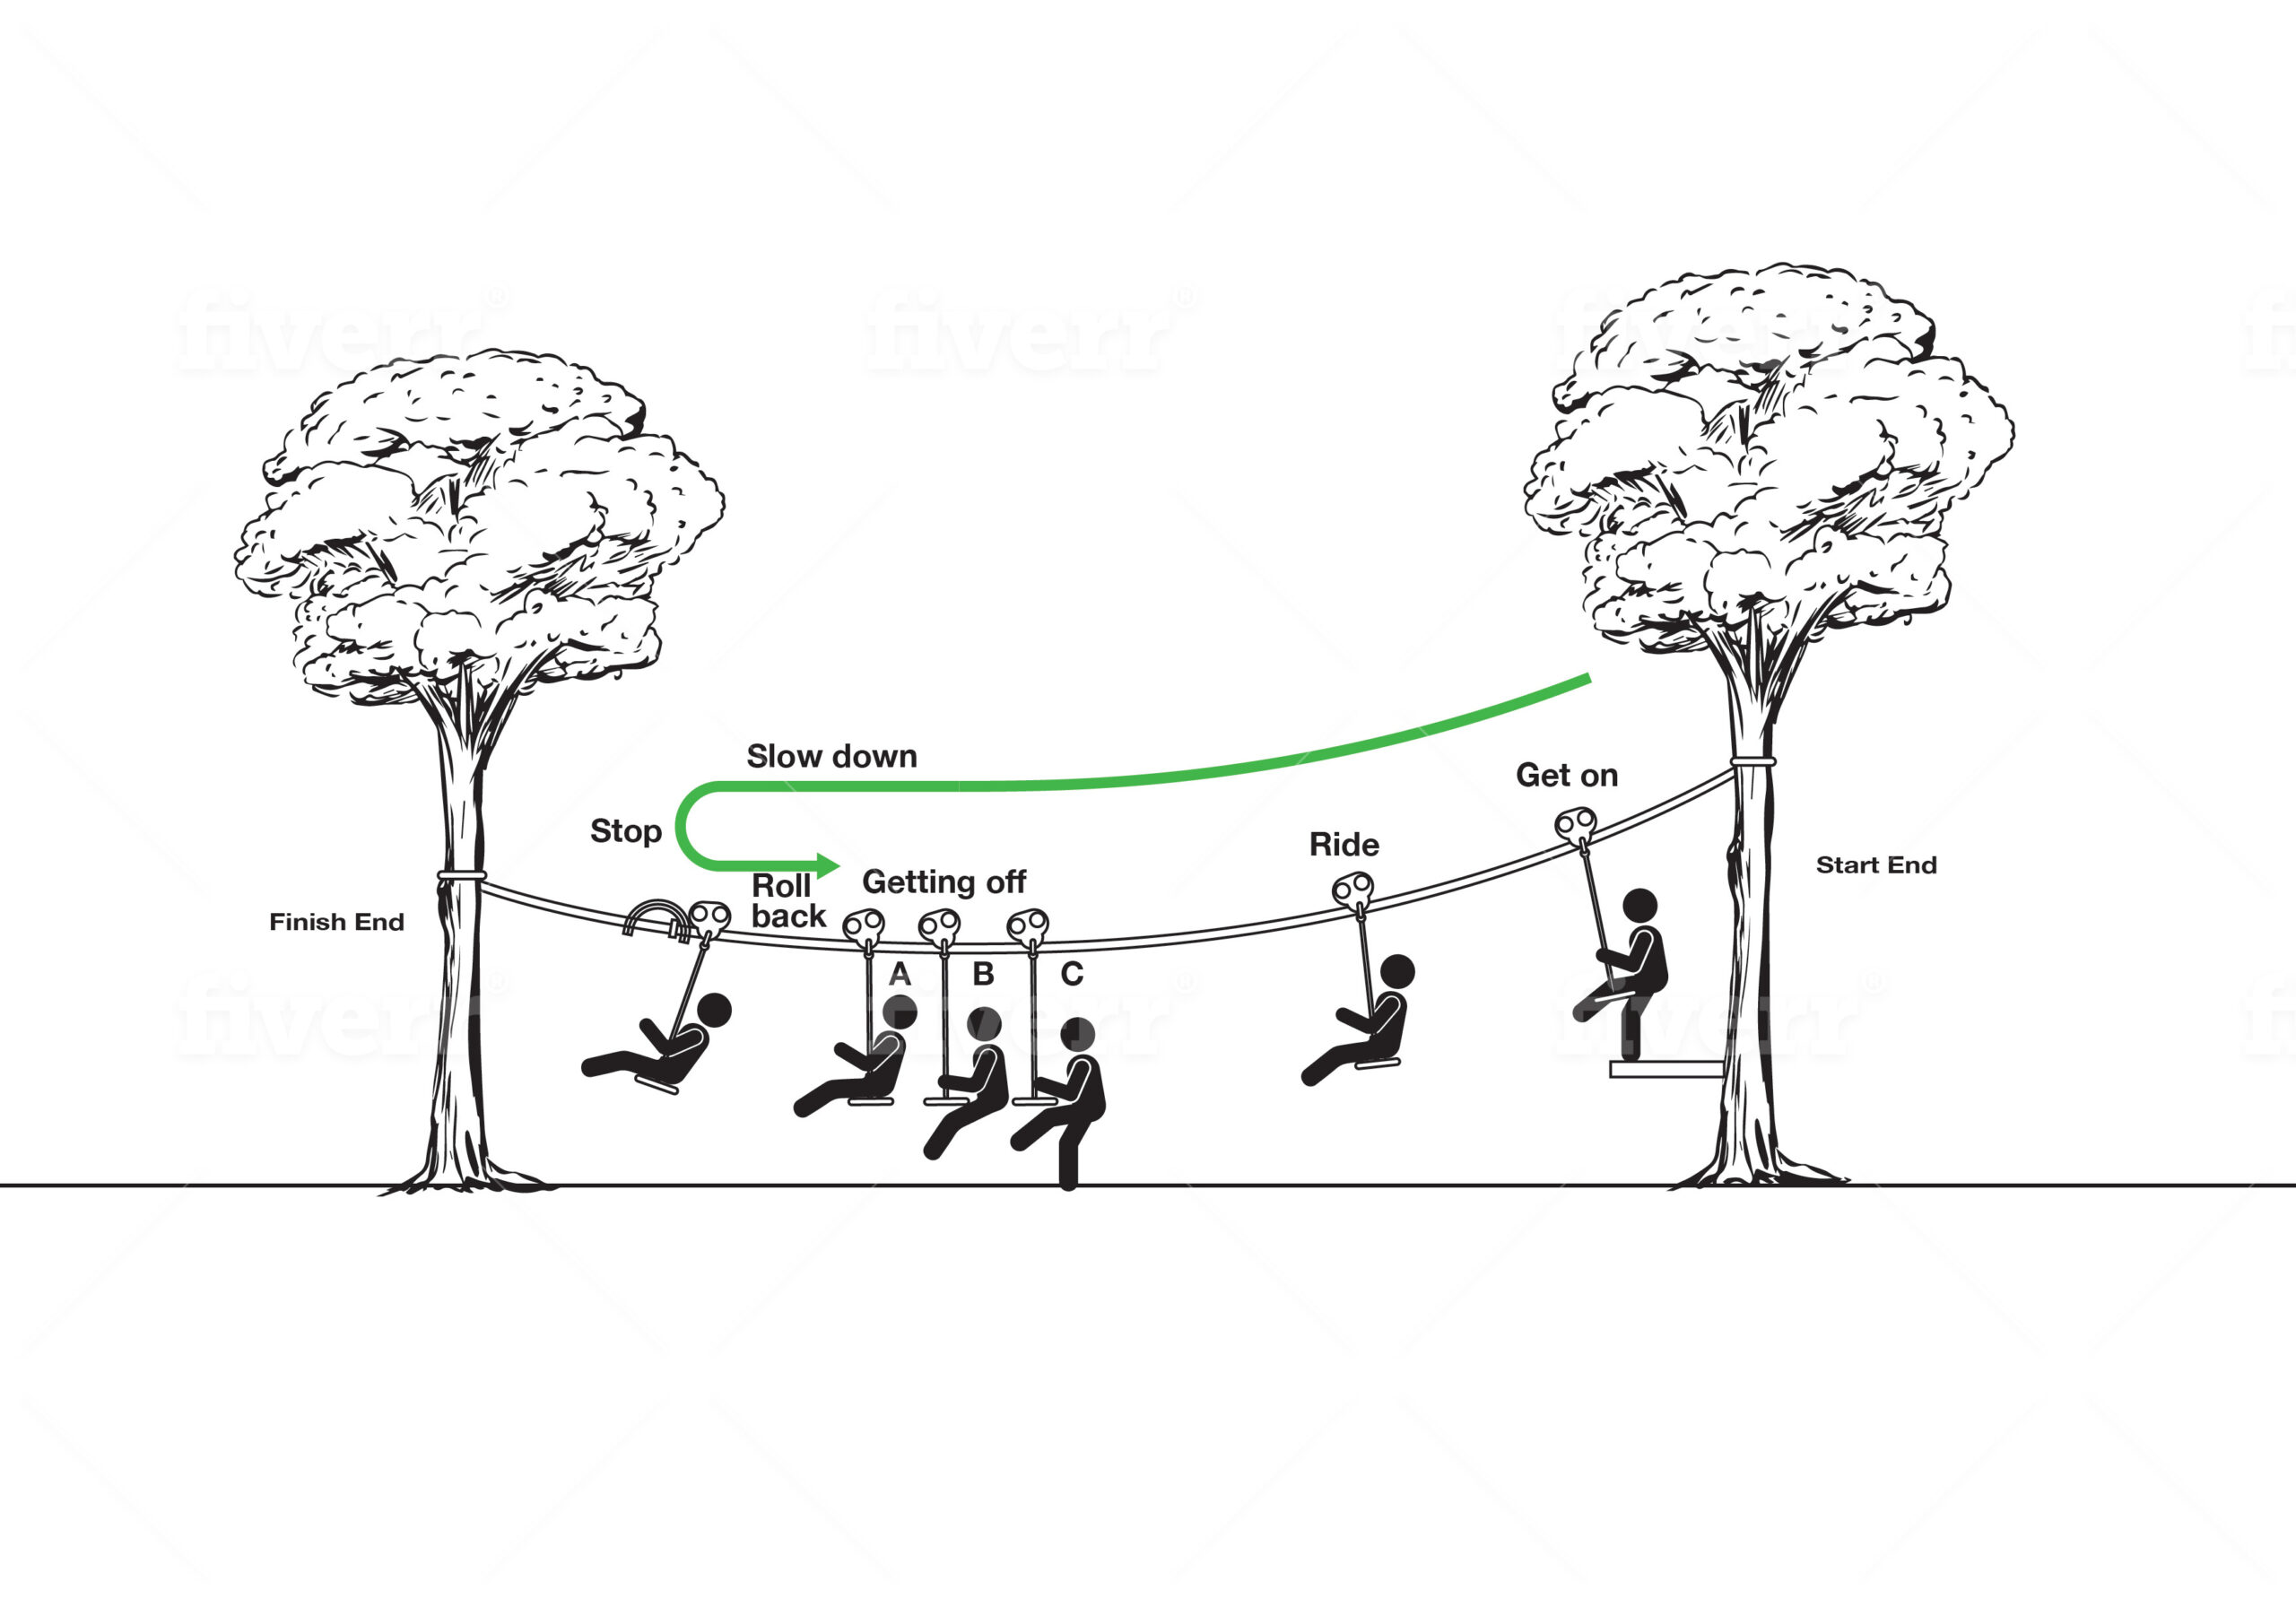
The Play Type:
The user rides to the end of the wire, “touches” the stop snake, then rolls back to the lowest point, comes to stop, and gets off at the lowest point.
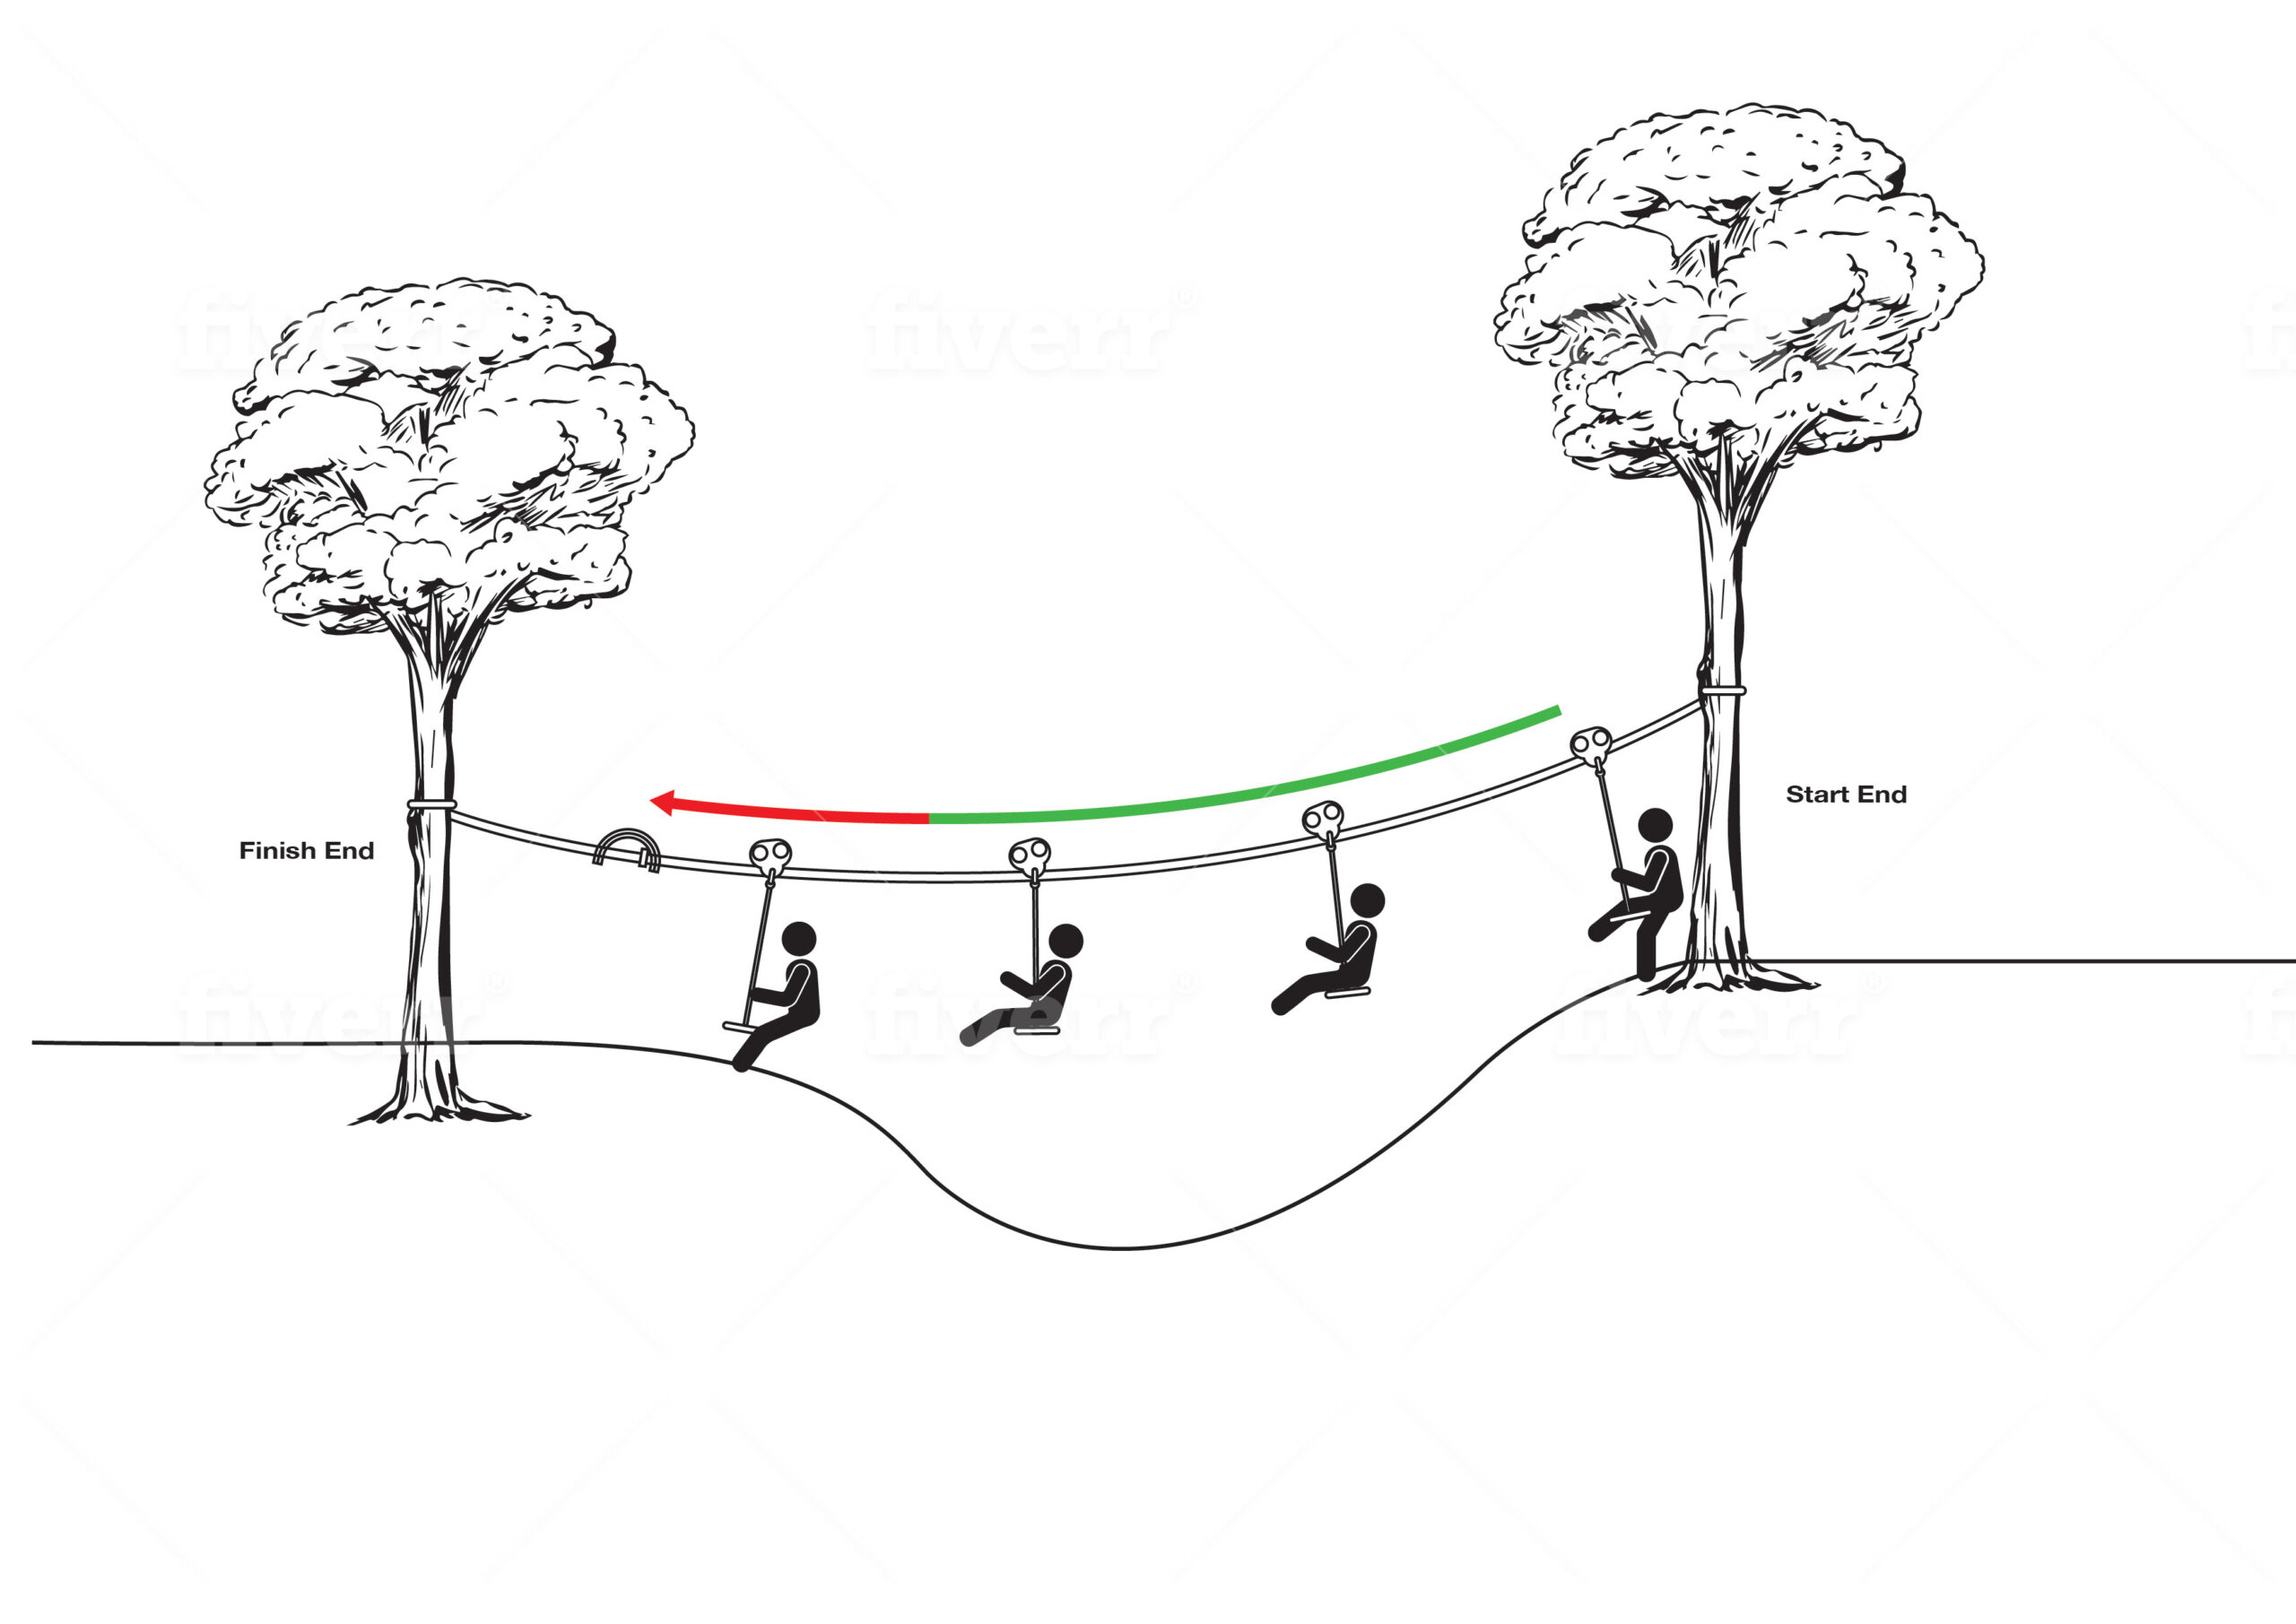
The Tour Type:
The user lands on a platform at the finish end.
Commonly used to cross rivers, dams, or for transport.
The Splashdown Type:
The user rides to the point on the wire that is best for landing, then lets go of the handlebar and drops into a dam or pool.
The Stop Snake is used to govern the point where the rider drops off.
Extra considerations for Splashdown zip lines.
1 How will you get the pulley back to the start?. (if you plan to pull it back with a rope you must make sure the user won’t get tangled in the rope)
2 How will you make sure the user doesn’t fall off over land at the start end?.
THE ESSENTIALS - Pommel seat or Handle bars.
The “Fox In A Box” Kit can be used with a disc shaped Seat or with Handlebars.
seats are best for Tour and Play types.
And
Handlebars are nearly always used for Splashdown kits, as you need to be able to let go and drop.
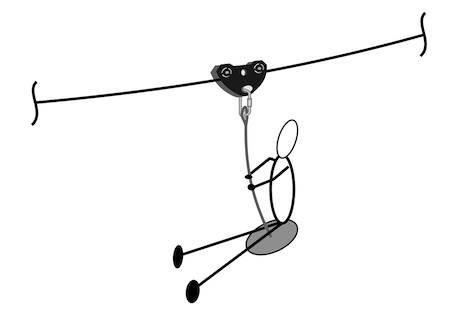
PROS
- Best For Little ones 3-8.
- Best for longer lines
- Can Incorporate a braking system.
CONS
- Riders can spin in mid flight.
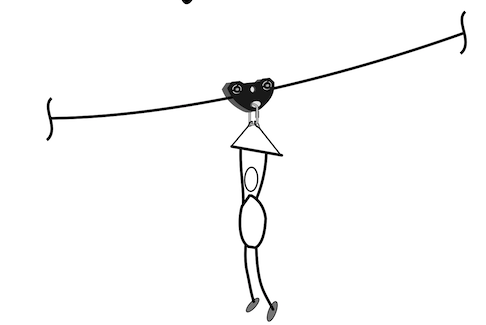
PROS
- Real consequences if you let go.
- Perfect for the Splashdown.
- Easy to get on and off.
CONS
- Taller and Shorter riders will be at different heights (Imagine a small kid riding behind the adult in the image) – little ones can’t reach the bars.
- Need good finger strength.
- Not suitable if you add a bungee brake.
PART 2: THE PERFECT ZIPLINE
“Anyone can make a zip line go – its making it stop where you want that is the skilful part”
The perfect zipline is the one where the users AND Supervisors can have fun.
And this bit is important to kids -users have lots of turns.
So building a 500m long zipline with harnesses, means that the users only get a few turns. When they have finished they have to walk up a 500m hill and the supervisor is always managing safety.
In this section we will get some clarity on some important points.
- Speed
- Span
- Topography
- How much gradient will you need?
- Stopping
- Bungee Brakes
- Acceptable fall heights
THE PERFECT ZIPLINE - Speed.
The right speed is a very important part
We are aiming to get the rider to have a zippy not boring ride – then slow a bit and come to a stop, safely.
Ideally we want the rider to stop by gravity.
A gravity stop means that the rider will accelerate down the first half of the zip line, then begin to slow down naturally, with no braking (by the rider) or brake mechanism required.
On a “Play” Type Zip Line the rider might just hit the “stop snake” and pendulum up a bit.
On a “Tour” Type zip line the rider will approach the landing at “jogging speed”.
Sometimes, (usually because the “fall of the land” is too great) the zip line runs too fast and we cannot manage the speed with gravity alone, we can add a brake mechanism, (a bungee brake) to absorb some of the incoming speed, but we must be sure the rider won’t “slam” into the brake, pendulum up too aggressively and hit the wire.
Relying on users to operate a brake can work too, but we’re not going to cover that here, as those types of zip lines have their own special risks, and we prefer to have fingers and hair well away from the pulley.
THE PERFECT ZIPLINE - Span.
The right length
The length (SPAN) should be in the range of 20- 100 meters long.
40-70m being optimal.
Longer isn’t always better, if the zip line is too long, it increases the waiting time, and the motivation needed to pull the seat back to the start.
The span of the zip line you build will be largely determined by the flatness / fall & shape of the land
THE PERFECT ZIPLINE - Topography.
We must make sure that the zip line is in a good relationship with the ground. We need to minimise how far the user could fall, yet be high enough so that they don’t hit the ground.
Ideally the curve of the wire will follow the shape of the ground.

Zipline follows shape of ground
This is almost perfect, if you had an excavator you would build it like this, the ground follows the sag in the zip line, so the rider is always the perfect distance off the ground.
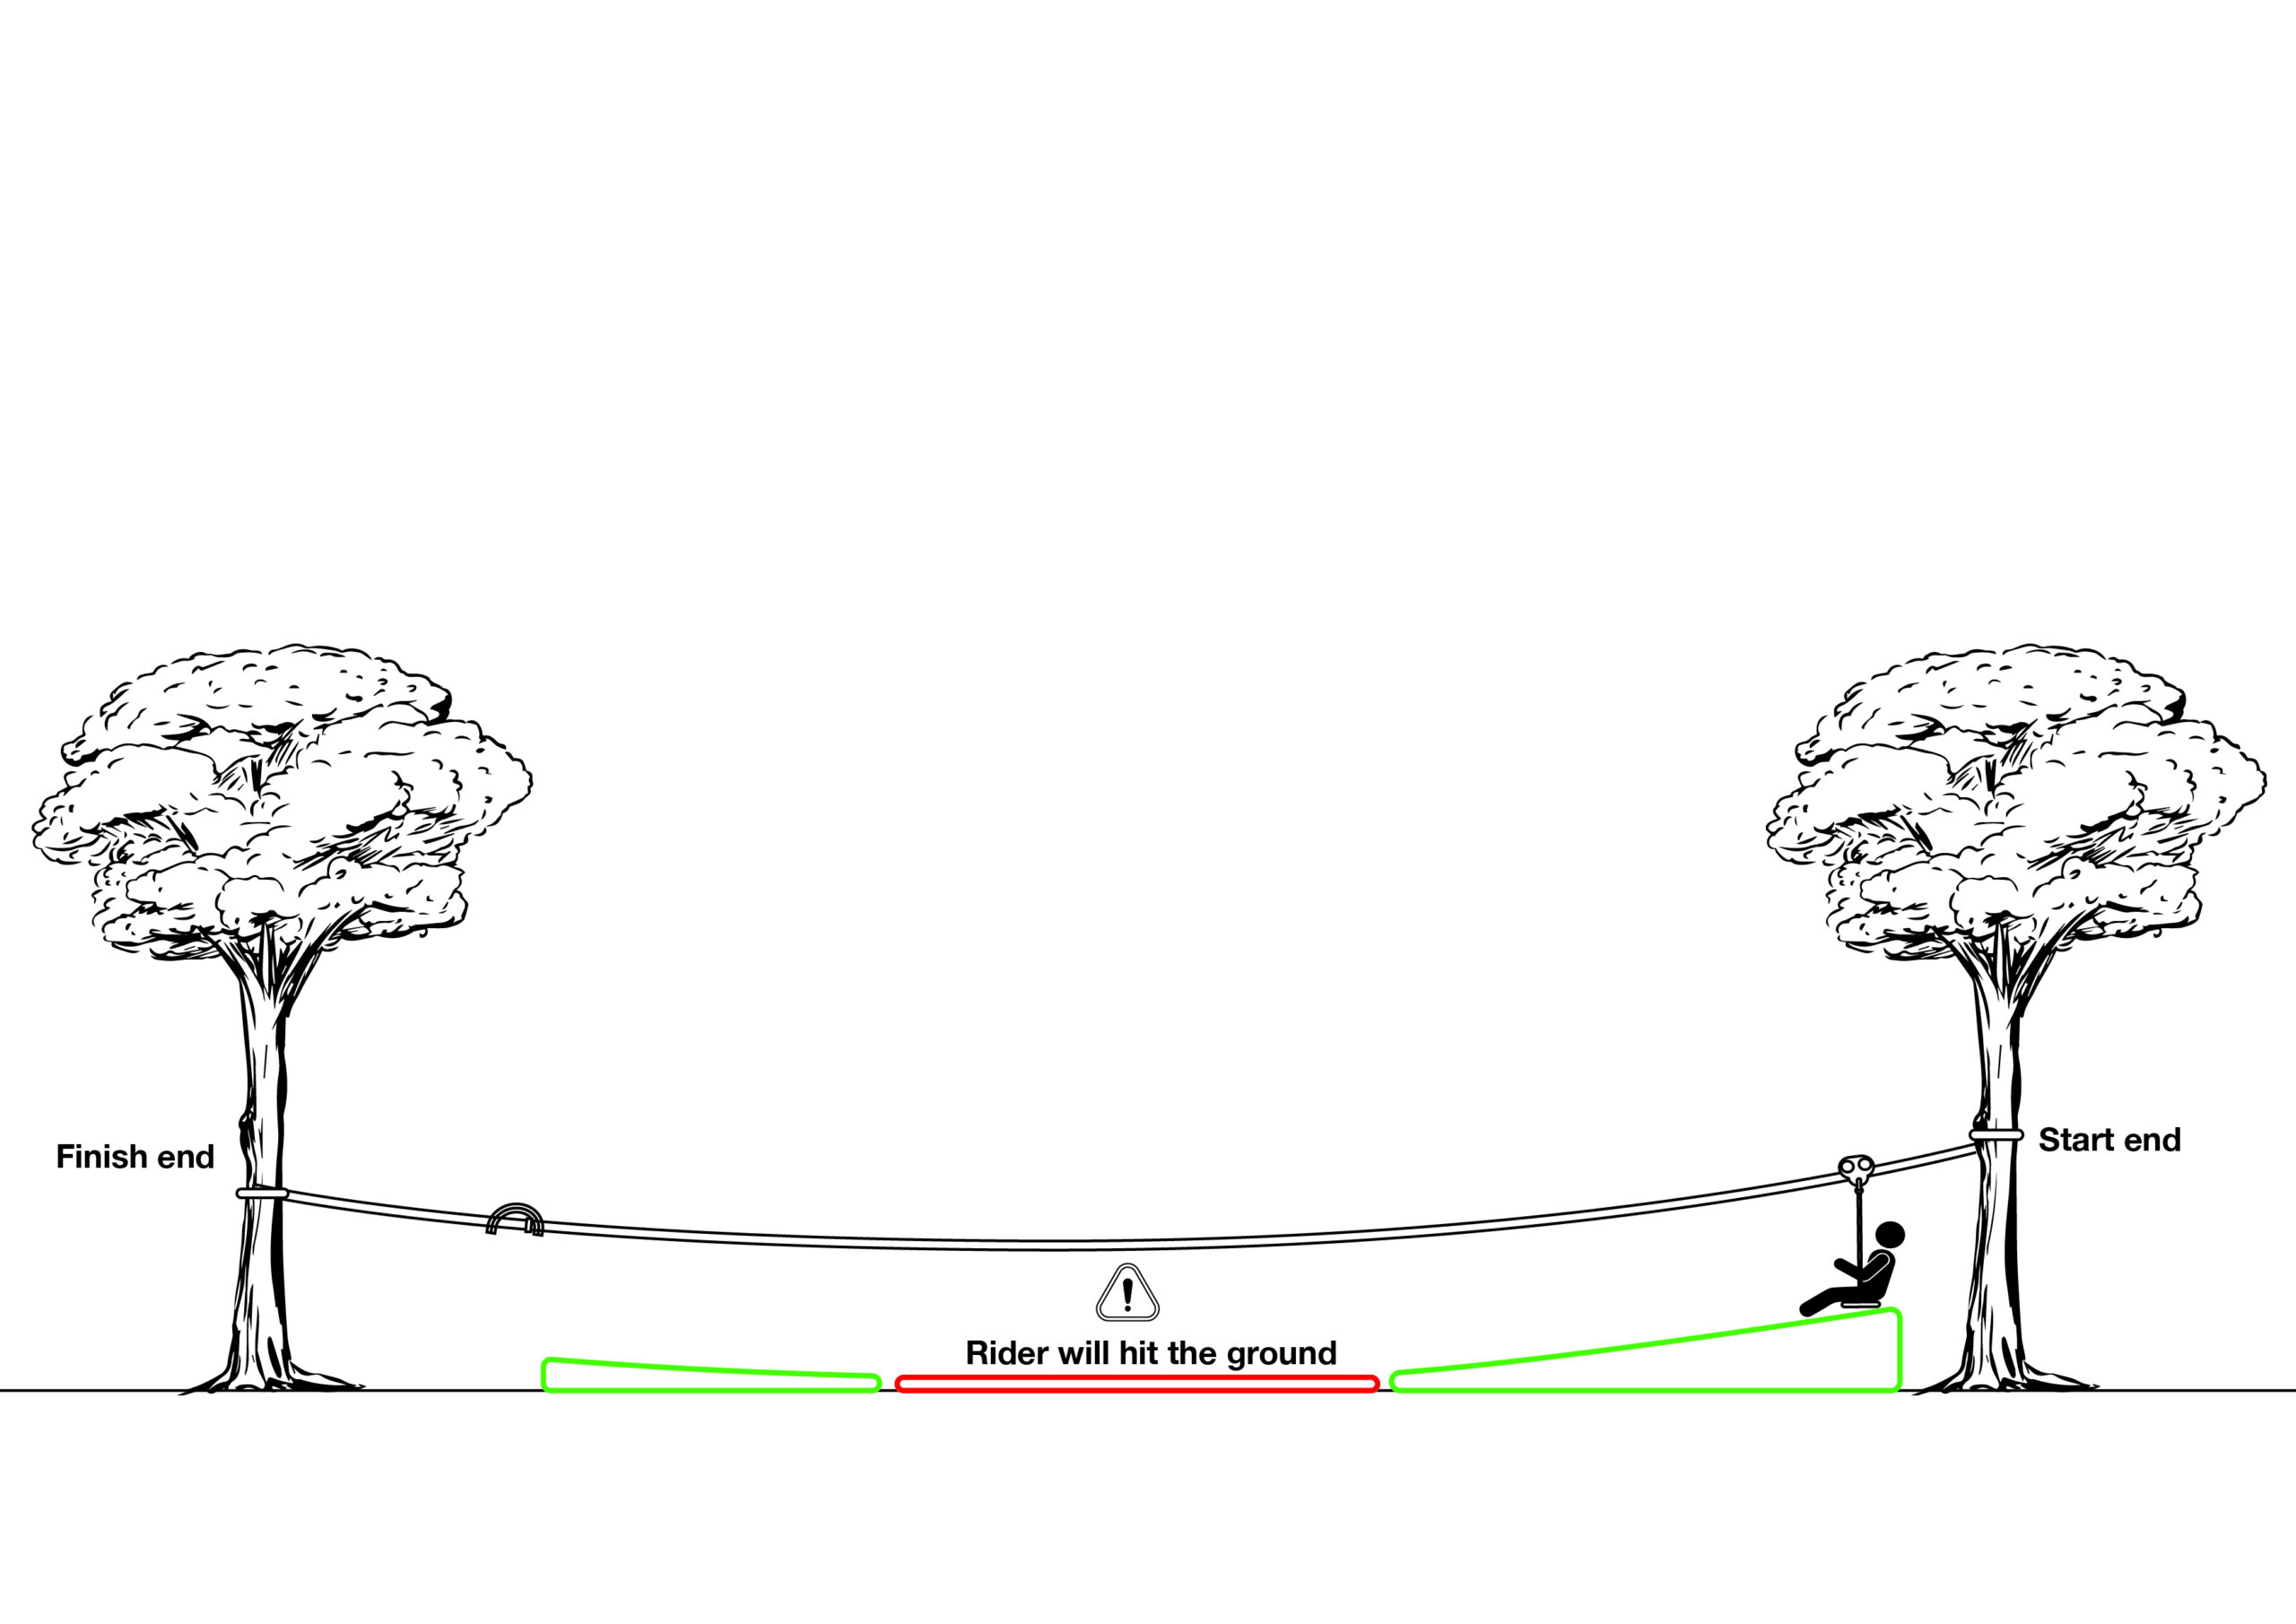
Ground is flat zipline too long – Not enough clearance
We have found that 25-30 meters is about the longest zip line we can build on this, before ground clearance becomes a problem.
Of course you can attach the wire higher at the start and finish to fix this problem, but then the Fall Height becomes an issue.

Ground has a high spot – Not enough clearance
This is difficult to work with. the sag in the wire created a ground clearance problem.
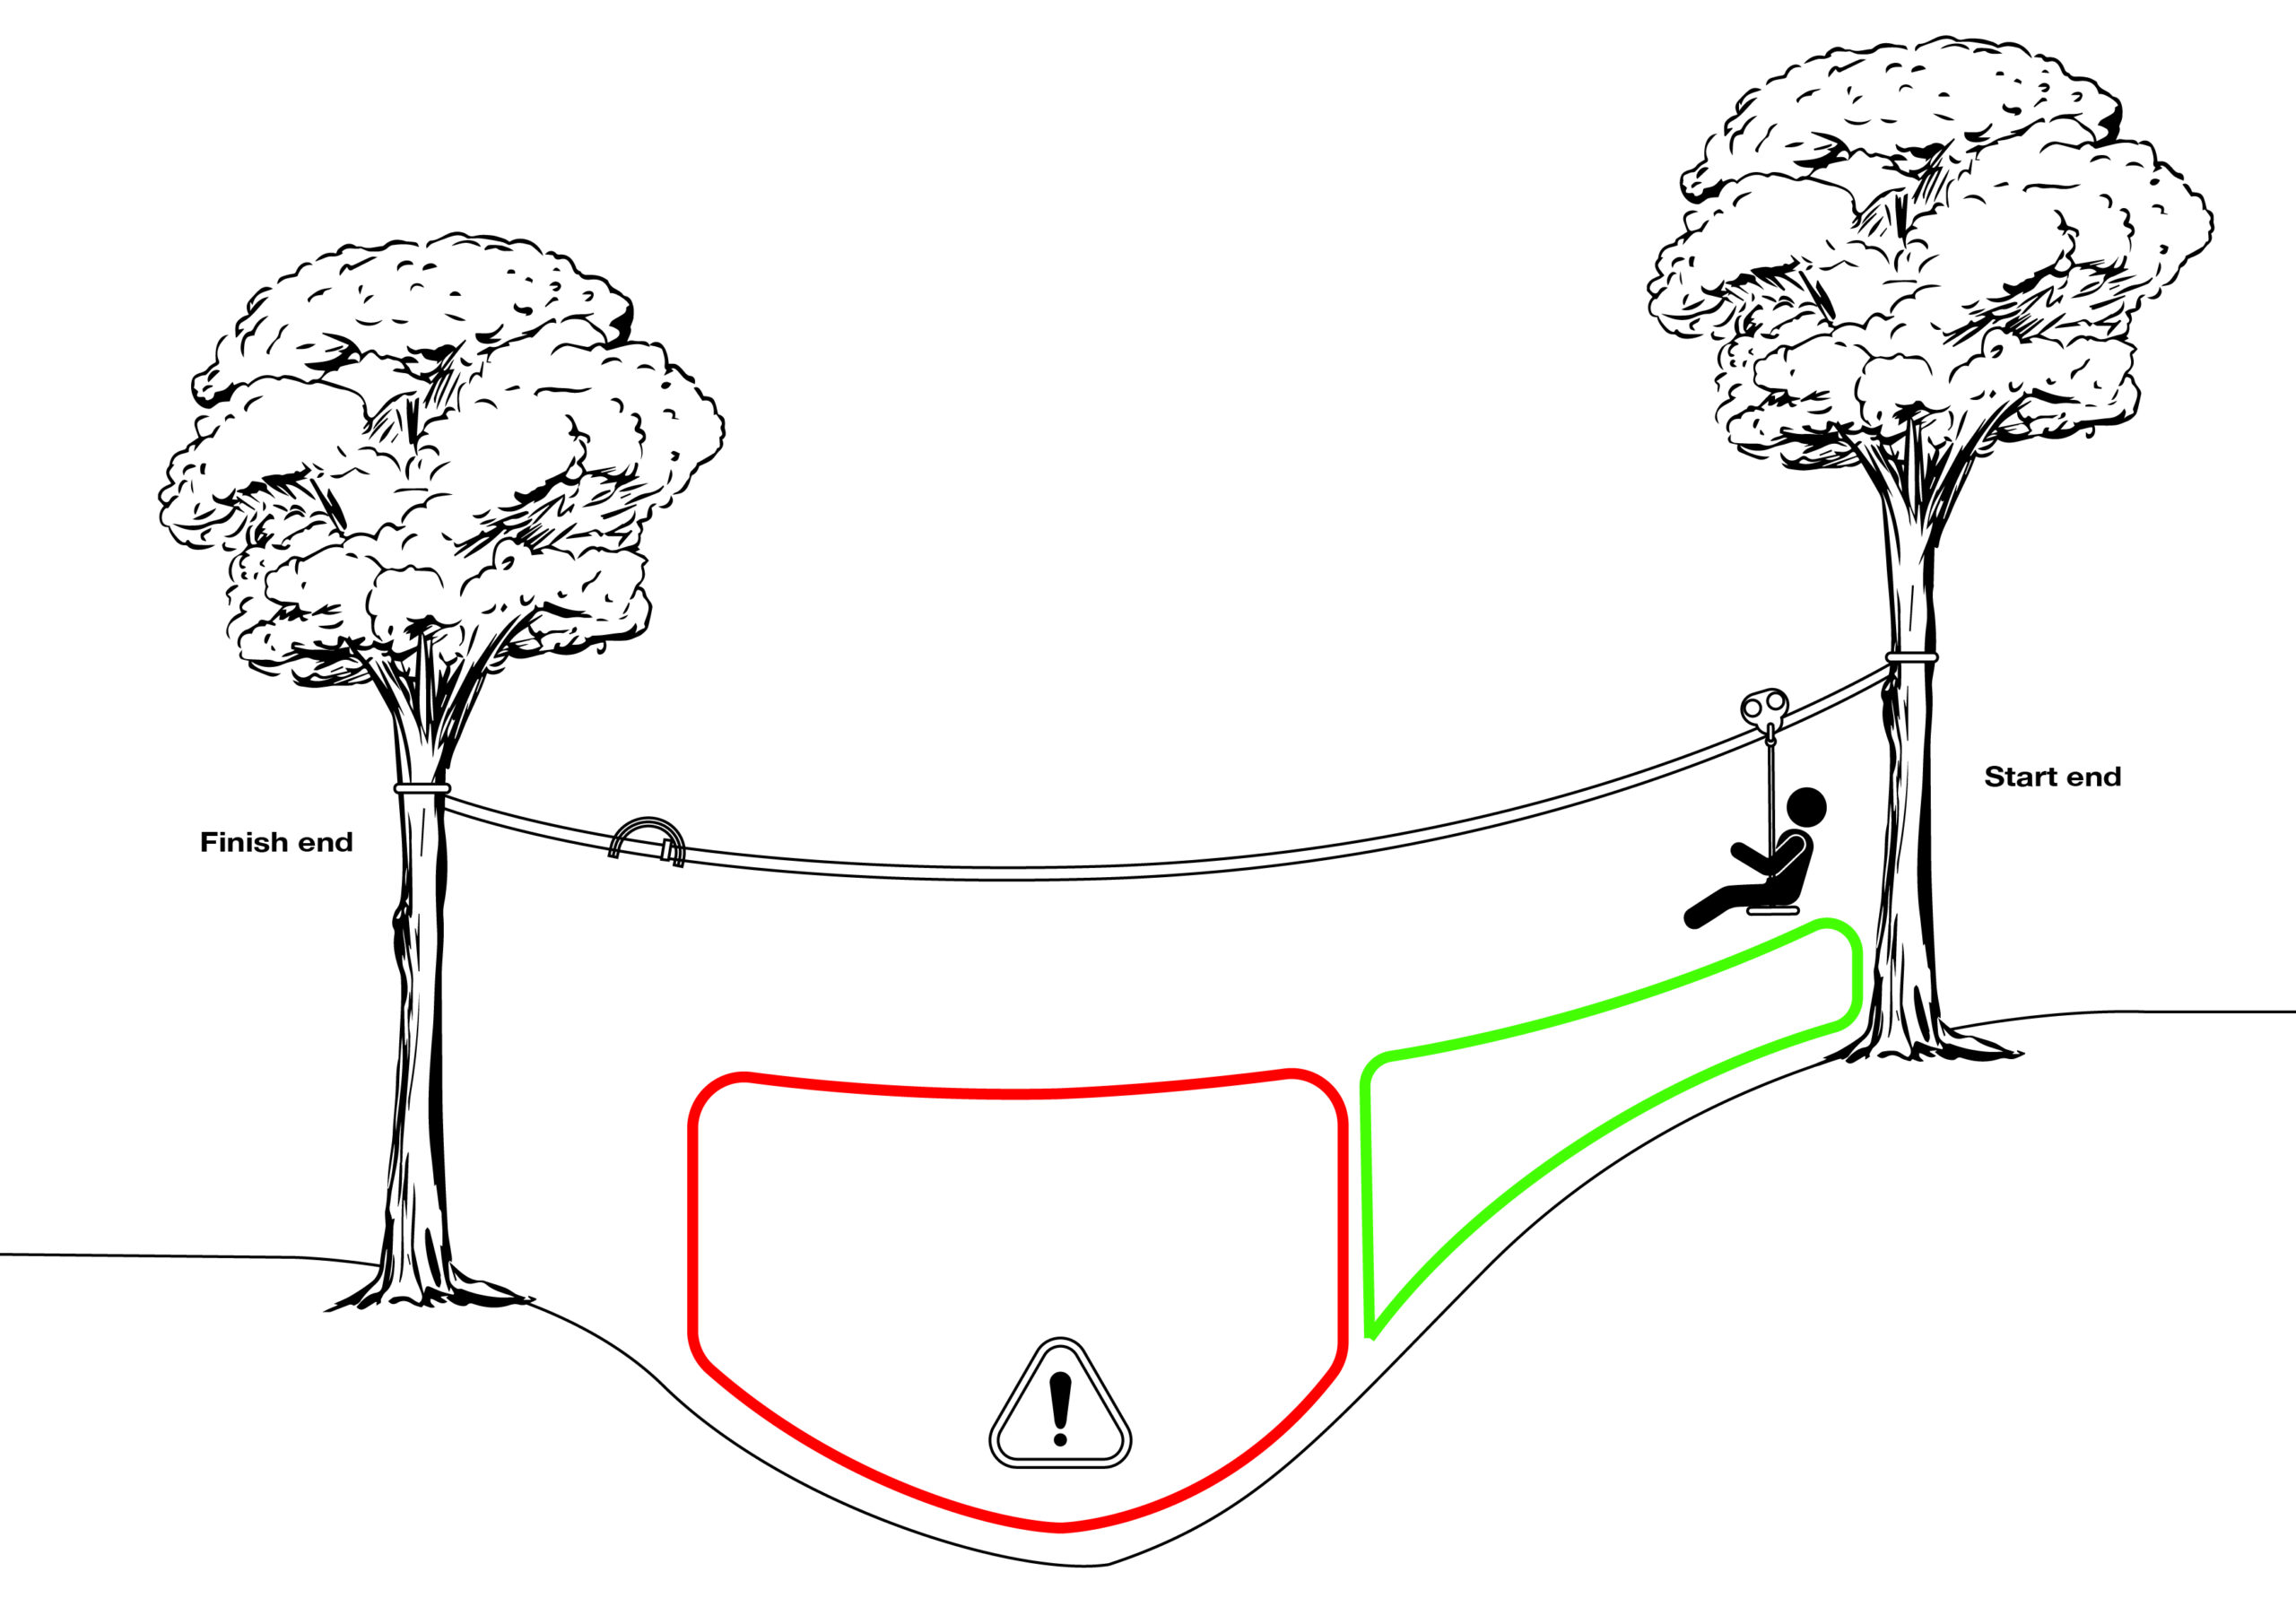
Ground is too steep – Fall is too big
In this example fall height has become the problem, the gradient of the wire is correct, but it needs to be too high up at the finish end, to control the speed.
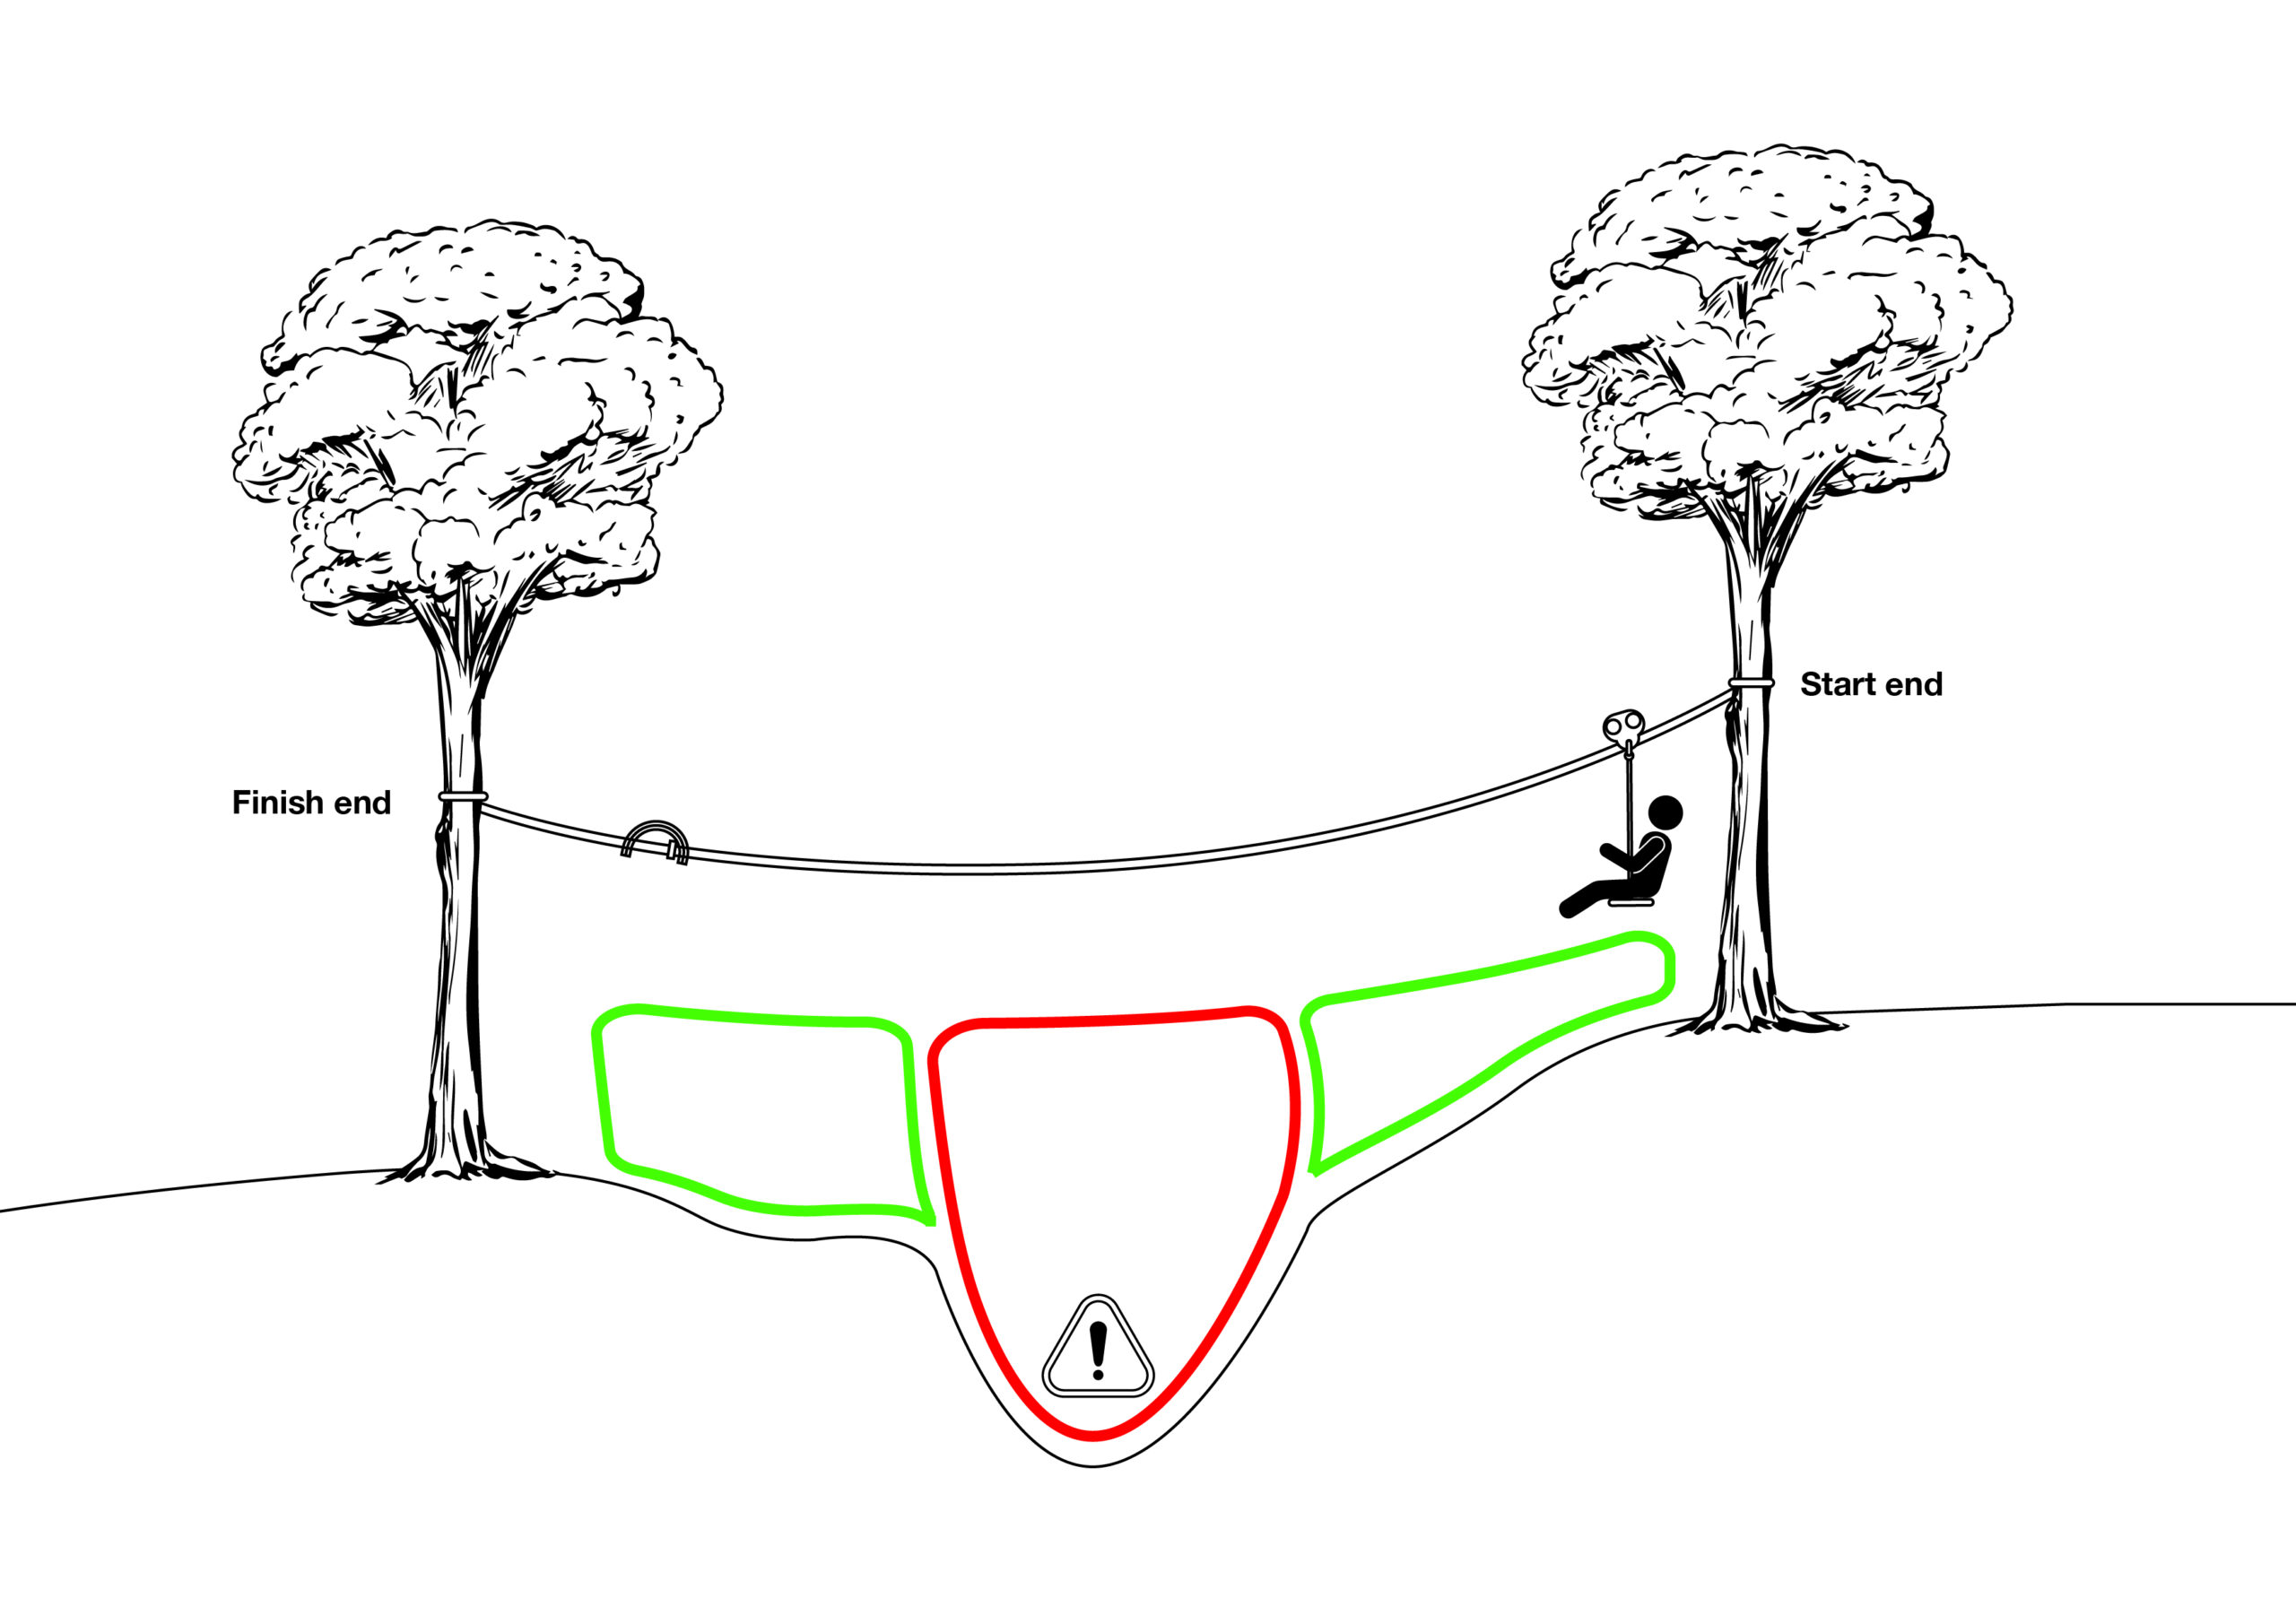
Gully is too deep – Fall is too big
In this example fall height has become the problem, as the user could fall off over the gully
THE PERFECT ZIPLINE - How much gradient will you need?.
So we have built literally hundreds of these “Fox In A Box” Zip-Lines now and we have made computer models to take much of the guesswork out of this.
“Play type”
We have found that a gradient of 4.5% (4.5m per 100m of zip line) will be perfect.
“Tour type”
We have found that a gradient of 4%
(4m per 100m of zip line) will be perfect.
“Splash Down”
Depends where the drop off is. But a gradient of 0% – 2% ( 0m – 2m per 100m of zip line) will be typical for stopping near the middle.
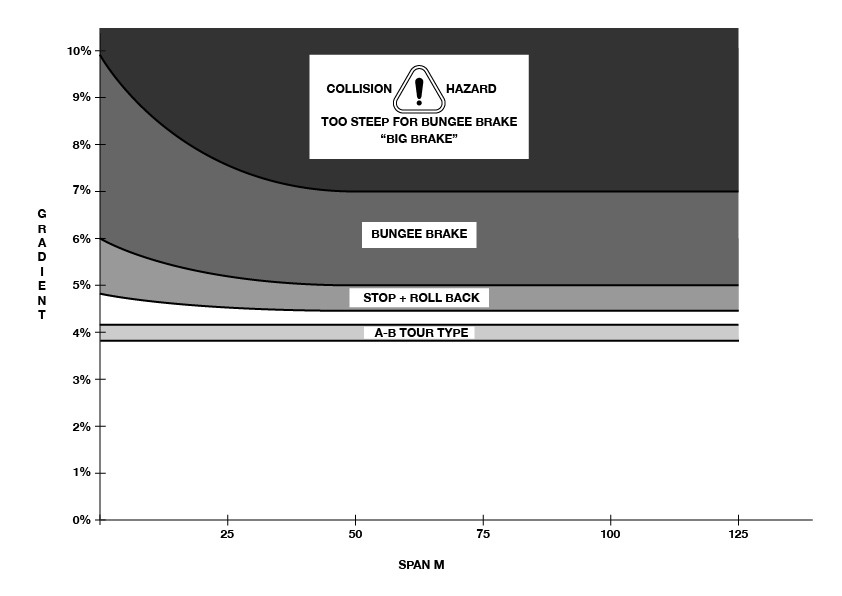
If your gradient is between 5.5% and 7% you will probably need a bungee brake.
Your gradient should not exceed 7% – as this may result in a high speed collision.
THE PERFECT ZIPLINE - Stopping
Stopping
Hitting the end:
All “Fox In A Box” Zip-Line Kits are supplied with a “Stop Snake”, the stop snake is a governor, it is positioned on the zip line to prevent a rider from hitting the tree at the end.
The stop snake is a tough piece of rubber belt, and it is held securely in place with wire rope grips.
The stop snake is not a brake, it doesn’t absorb very much of the speed of an incoming rider. If a rider hits the “Stop Snake” they will pendulum up, (This is okay and can be fun, but a rider must never pendulum up past 45 degrees as they could collide with the wire)
It doesn’t matter if the rider is going to finish the ride at the ‘Stop Snake” or at a “Bungee Brake” or some other “sophisticated brake system” 45 degrees is the limit to how aggressively a rider should come to a stop, and at least 2 meters of “FREE SPACE” (More if they are travelling faster) should be allowed, between the rider and the finish tree/pole.
THE PERFECT ZIPLINE - Bungee Brake.
Bungee Brake.
A bungee brake can be used to absorb some of the speed of an incoming rider, it is a sliding block attached around the zip-line and positioned between the riders pulley and the stop snake.
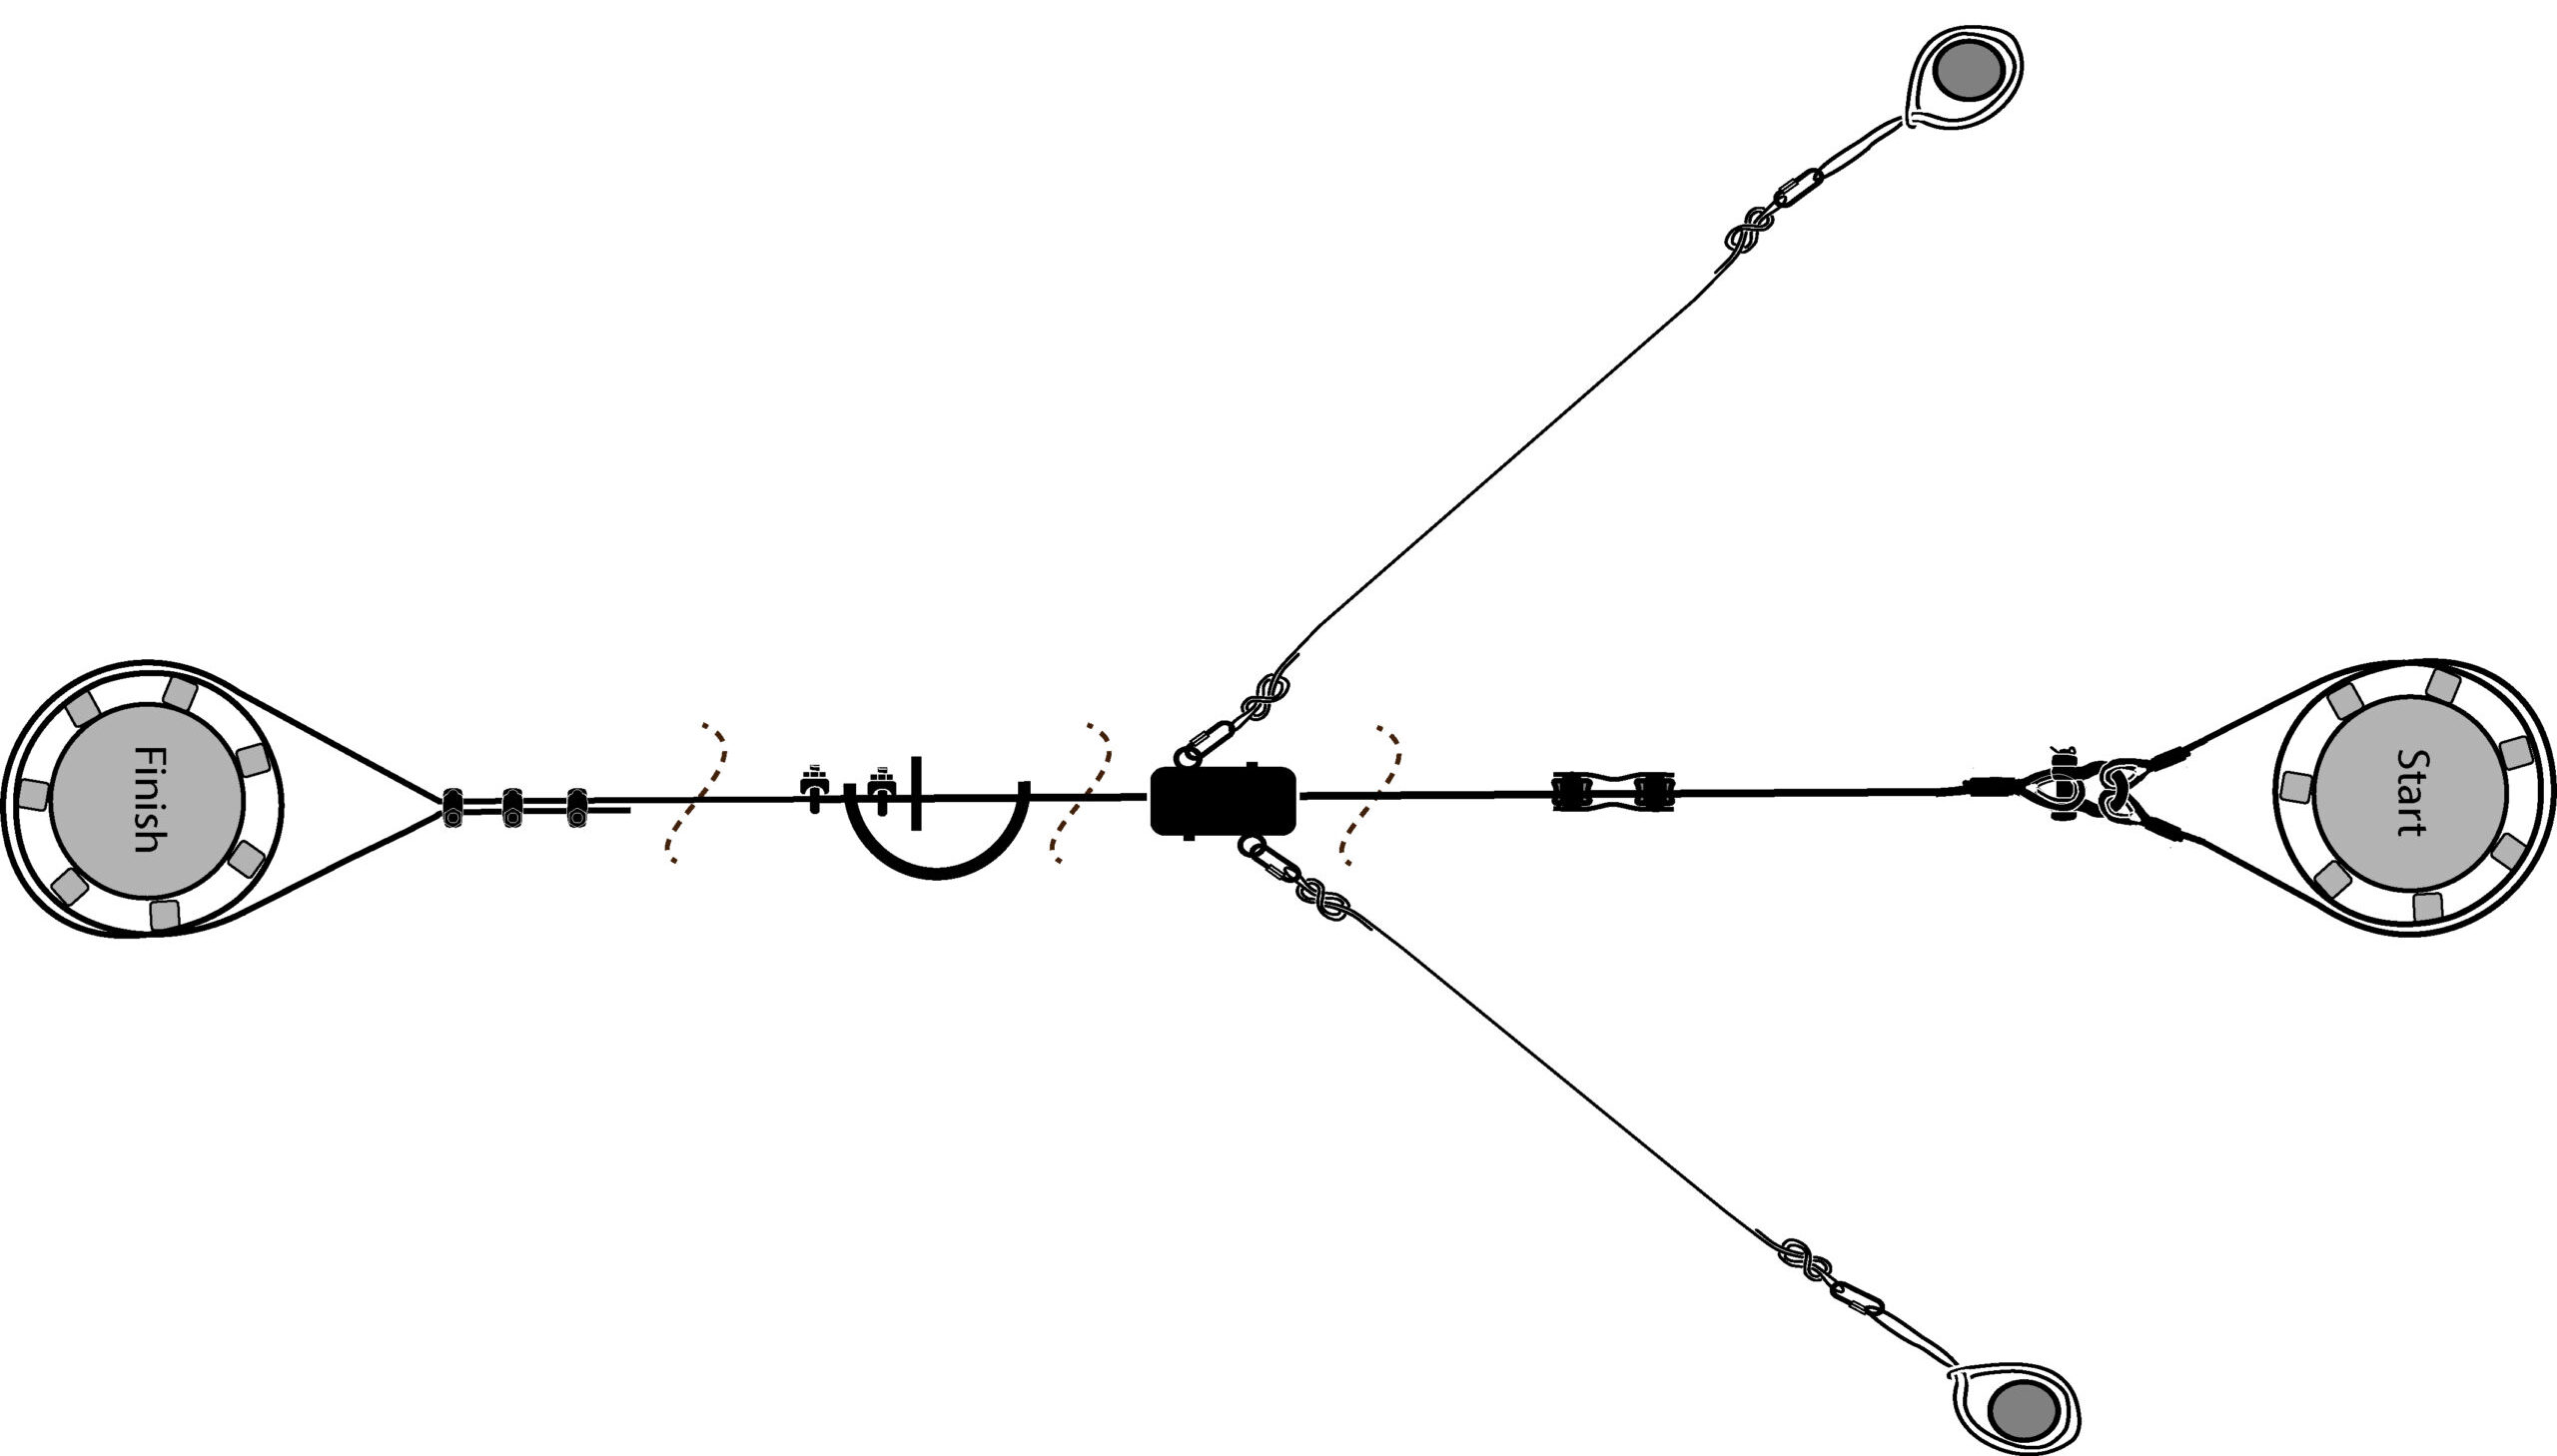
Bungee Brake Arrangement
The bungee brake has 2 pieces of bungee rope attached to the brake block. You will need install 2 anchors in just the right spotfor the brake.
THE PERFECT ZIPLINE - Acceptable Fall Height.
Most would agree that if our aim is “active, healthy, challenged, engaged, kids” then the risk of getting a few scrapes and bruises is acceptable. Equally most would agree that it would be unacceptable for a fall to result in serious debilitating injury or death.
You must use good judgement when deciding how high is too high.
We believe that it is too simplistic to prescribe an acceptable fall height for all users, kids can challenge themselves and grow through risk.
Factors such as the users age, strength/weight, fitness, experience, resilience, agility, appetite for adventure, should all be considered.
Some considerations:
- What will you fall onto?
- How capable are the users?
- How old are the users?
- How experienced are the users?
- How resilient are the users?
- How resilient are your kids friends? (they will probably want a turn).
- Will a parent “coach” little ones, until they are competent?.
- What is your own appetite for risk?
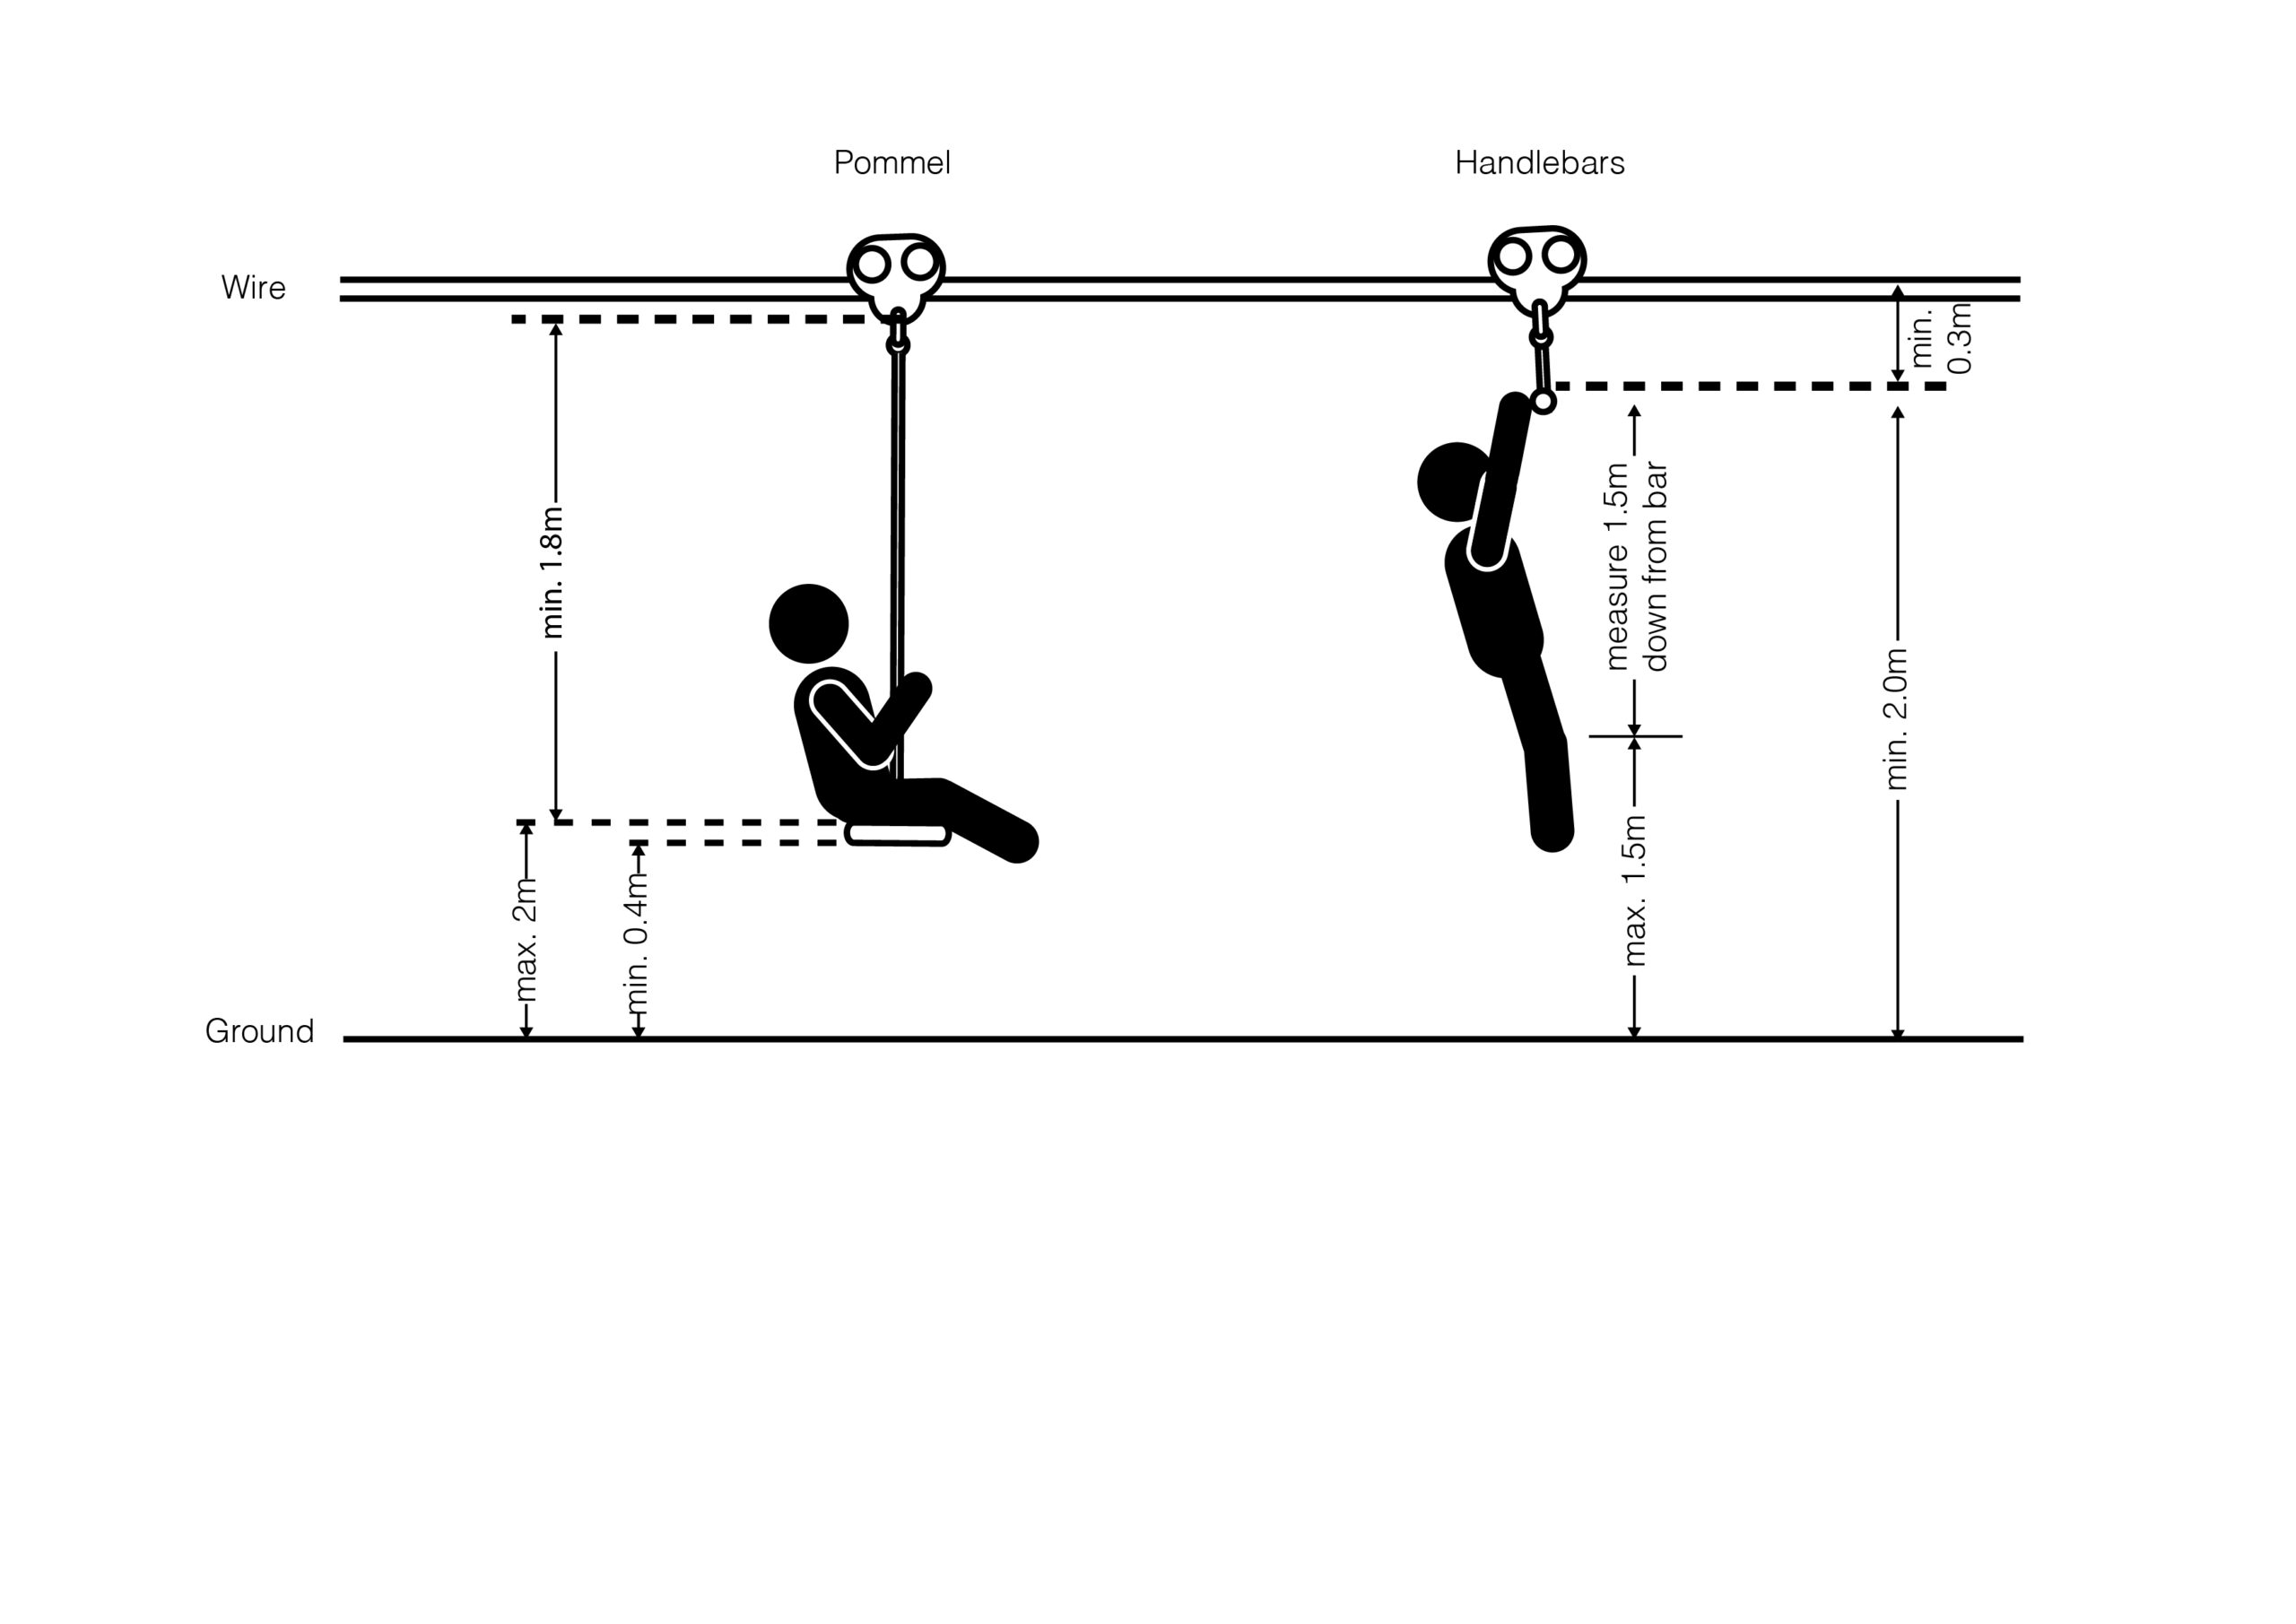
The figure below shows guidelines for fall heights, but you need to consider what is acceptable for your kids, please be clear, falling 2 meters from a pommel seat, onto bark chips may be acceptable for some fit agile teenagers, but much too high for a 3 year old.
PART 3: SITE SELECTION
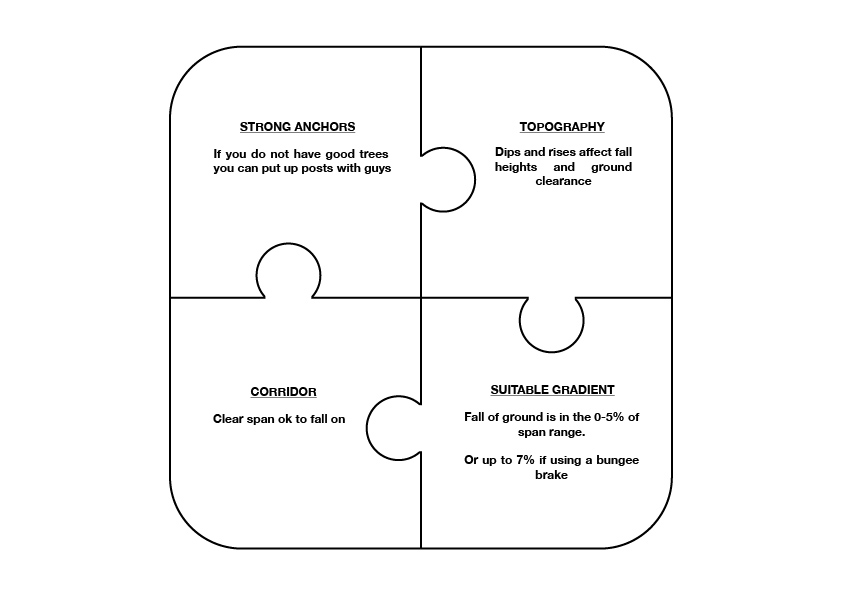
The zipline you can build will depend mainly on the site you have available. The shape or Topography of the land is the biggest factor, and we have covered that.
In this section we cover.
- Trees or Poles And Anchors
- Fall of your land
- Corridor
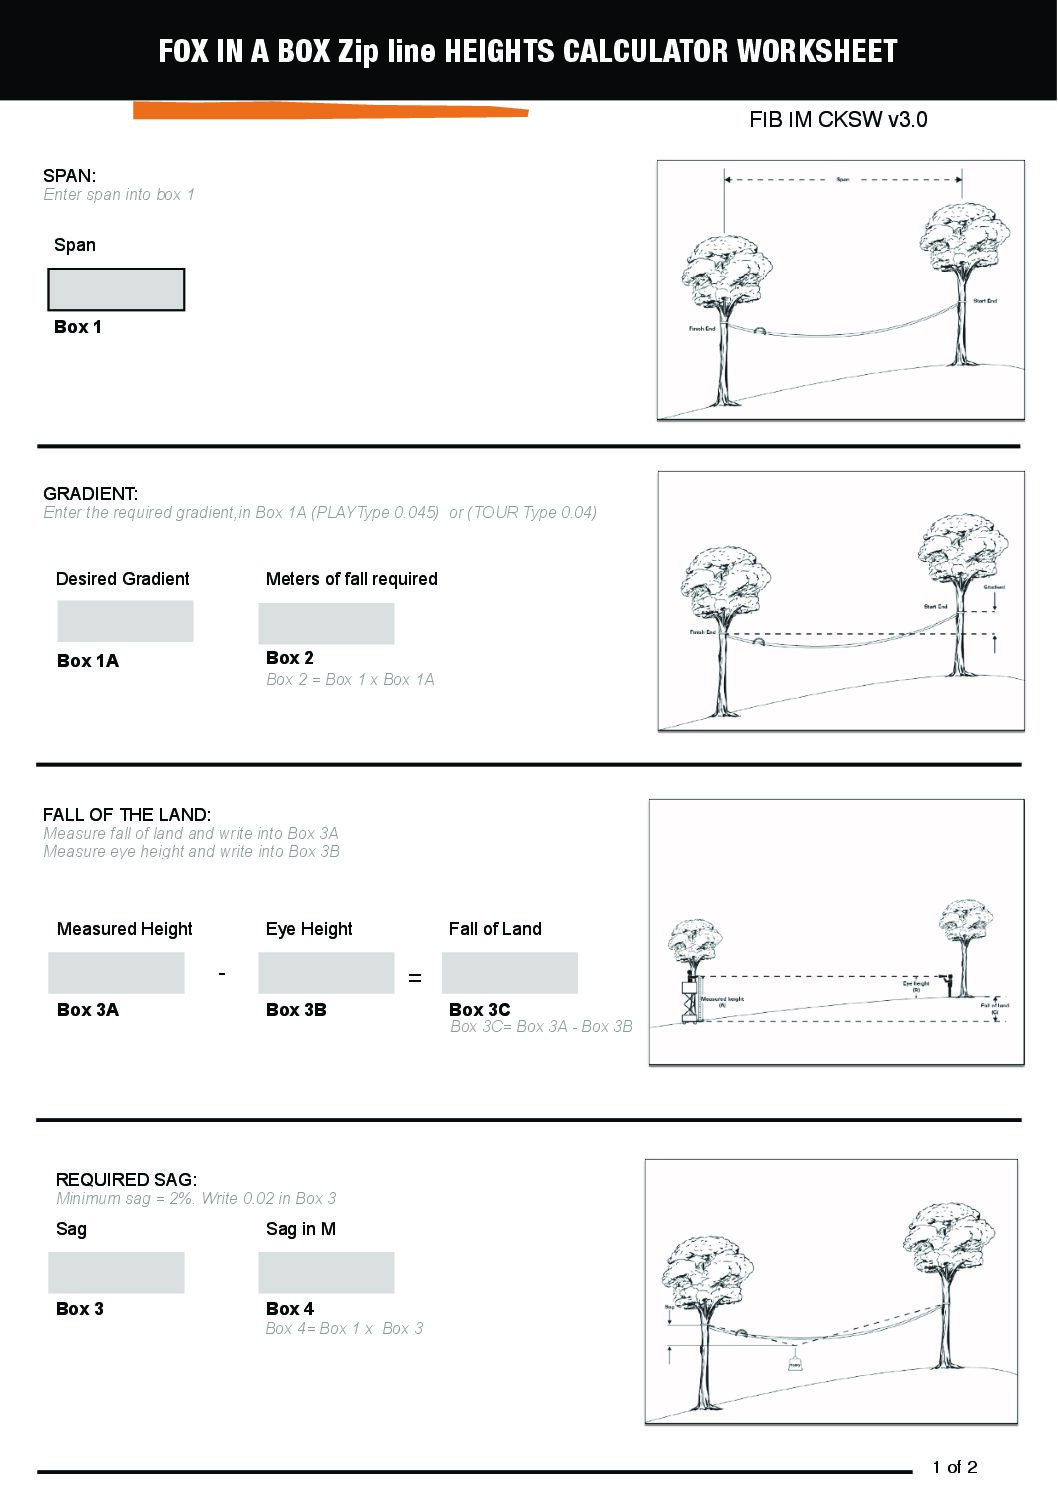
- Heights worksheet
SITE SELECTION - Trees Poles And Anchors.
Trees
Ideally you will have good, healthy, alive, stout trees.
They should be least 250 mm diameter at that point when you plan to attach the wire.
You should attach the wire to the main stem of tree, never to a branch.
Look above, even healthy trees can carry dead branches, you should remove dead wood.
Avoid trees with nesting , stinging insects.
Use good judgement – if you need help with determining if your trees are suitable reach out to a local arborist or tree expert.
What if you don’t have any trees
If you don’t have trees you will need to use timber poles or steel posts or something similar.
Timber poles should be set into the ground at least 1 m +10% of the poles length, for example a 5 m pole should be embedded into the ground 1.5 m.
Use good judgement – the type of pole you use (species), the type of soil on your land, how high the pole is sticking out of the ground, are all important to deciding how to do this, you may need help from an engineer.
Do not
Attach your zip line to , swing sets, monkey bars, power lines, dead trees stumps, rotten trees, excessively leaning trees, trees with exposed roots, trees or posts that have their roots in boggy wet sandy loose soil, or buildings (without help from an engineer).
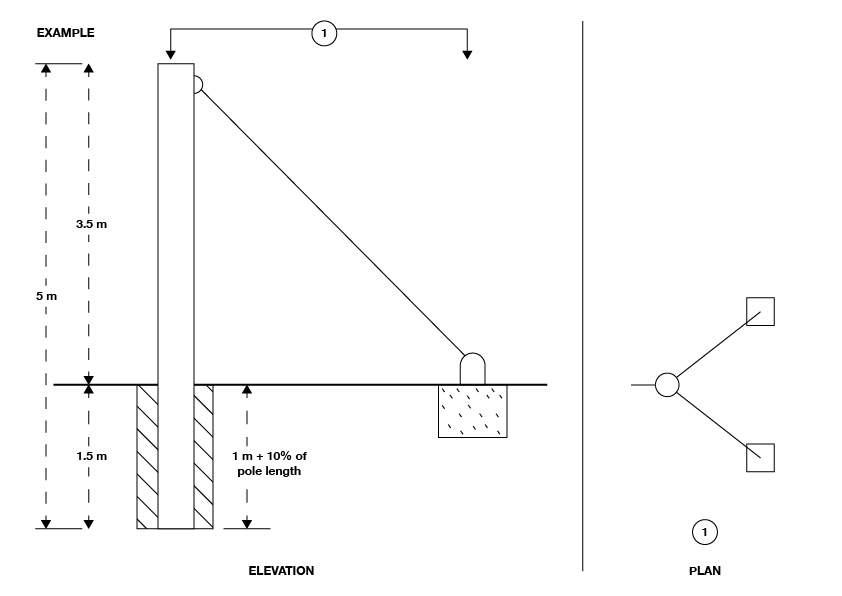
Pole embedment diagram
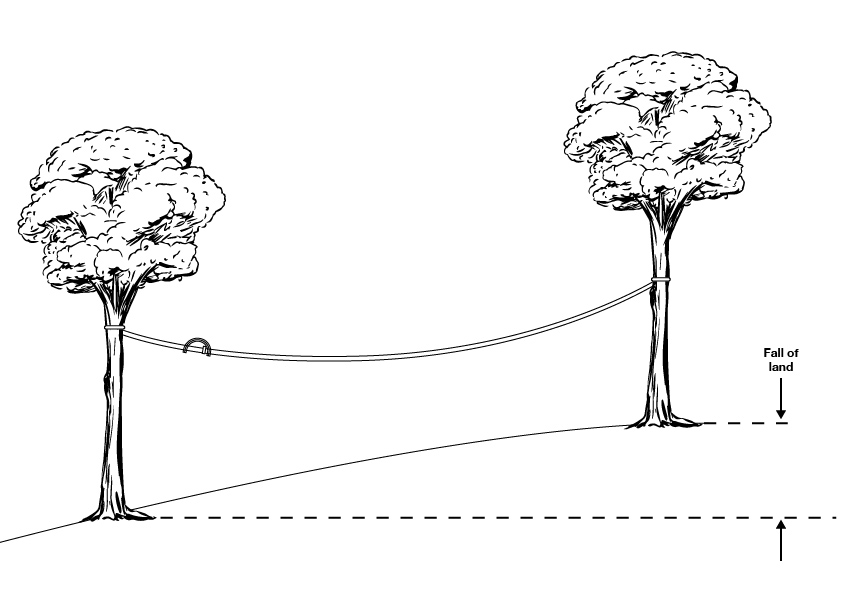
SITE SELECTION - Fall of Land.
Fall of Land.
You are not looking for a steep hill. Depending on which type of ride you want to build you need to make the gradient somewhere between 3% – 7%
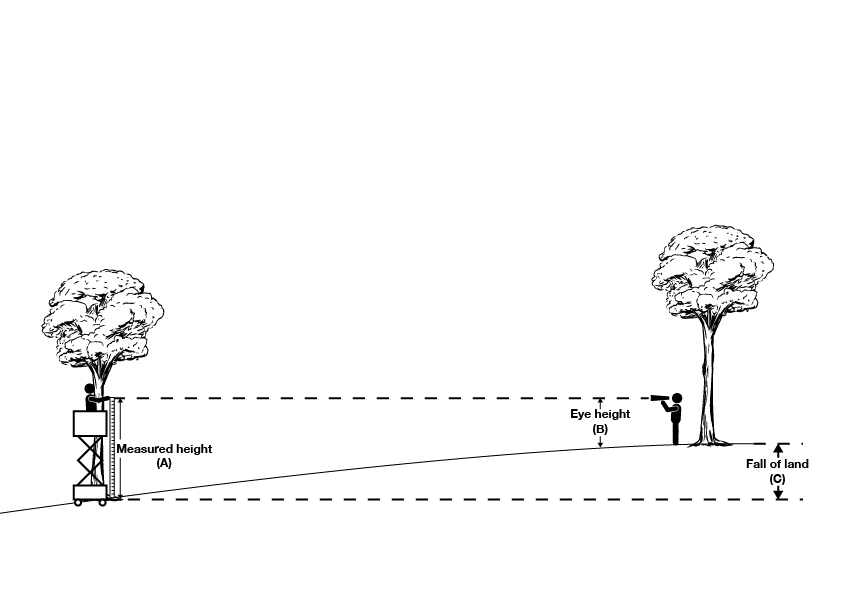
How to measure the fall of the land:
If your ground is flat you can skip this part.
If there is some fall here’s how to measure it.
1. PUT A MEASURE AT THE FINISH END.
You can use a tape measure , surveyors staff, or something similar .
(Hint: attaching a tape measure to a long stick can work, or throw a long tape over a branch, REMEMBER The ZERO end of the tape stays on the ground).
2. Look through or along your level. This gives you “MEASURED HEIGHT (A)”
You can use a Sighting Level, Dumpee, Theodolite, or just hold a long spirit level flat and look along the top edge.
3. MEASURE YOUR “EYE HEIGHT (B)”
This is simply the height of your eyes above the ground.
A Minus B = C “FALL OF LAND ”
SITE SELECTION - Corridor.
Corridor
This is the area between your start and finish points.
1. Clear the fall space.
The fall space is the ground underneath the zip line. You should look for space that is free of sharp, jagged rocks. and then clear loose boulders, sticks, or anything else that is a potential hazard.
2. The user occupied space
The space that the user will “zip through”, must be clear of obstructions. The space should be at least 1.5 meters each side of the zip line, and upto 2 meters above the wire. Clear any limbs, branches, bushes, fence posts, or any other potential hazards.

